How To Add Admin To 7 Days To Die Server
Want to take control of your 7 Days to Die server or give moderation power to trusted players? Adding an admin is essential for managing gameplay, kicking troublemakers, or activating commands on the fly. The process only takes a minute and gives you full control over the server environment. Here’s what you’ll get by adding an admin:
Server administrators in 7 Days To Die can:
- Kick or ban disruptive players.
- Teleport players or themselves.
- Spawn items or entities.
- Change game settings on the fly.
- Debug issues and manage server performance.
Before you begin, ensure you have:
- Access to your server files: This is crucial for editing configuration files.
- The server running: While you'll need to restart it after making changes, it's good to know its current state.
- The Steam64 ID of the player(s) you want to make admin: This is a unique identifier for each Steam account. You can find it using websites like SteamID.io by entering a player's Steam profile URL.
Method 1: Using The serveradmincustom.xml File
This is the most common and recommended method for adding permanent administrators to your 7 Days To Die server. Changes made here will persist even after server restarts.
- Locate the serveradmin.xml file:
- Navigate to your 7 Days To Die server's root directory.
- The serveradmin.xml file is typically found in the 7DaysToDieServer_Data\Managed folder, or sometimes directly in the server's main directory.
- Open serveradmin.xml with a text editor:
- Use a plain text editor like Notepad (Windows), Notepad++ (recommended), Visual Studio Code, or Sublime Text. Avoid word processors like Microsoft Word, as they can add formatting that breaks the XML.
- Understand the XML Structure:
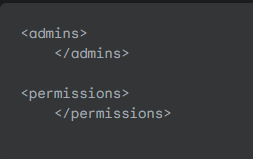
- You'll see a structure similar to this:

- The <admins> section is where you define who is an admin and their permission level.
- The <permissions> section defines which commands are available at each permission level. permission_level="0" is the highest (most powerful), and higher numbers have fewer permissions.
- Add a New Admin:
- Inside the <admins> tags, add a new line for each player you want to make an admin.
- Replace YOUR_STEAM64_ID with the actual Steam64 ID of the player, and choose a permission_level.

- Permission Levels:
- 0: Full administrator access (can use all commands). This is usually for the server owner.
- 1, 2, 3, etc.: Lower permission levels, often used for moderators or specific roles. The default serveradmin.xml defines what commands each level can use. You can customize these in the <permissions> section if needed.
- Save the serveradmin.xml file.
- Restart your 7 Days To Die server:
- For the changes to take effect, you must stop and then start your server.
Method 2: Using The Server Console
This method allows you to add admins directly through the server console or in-game, but these changes are often not persistent across server restarts unless explicitly saved by the server software (which isn't always the case for all commands). It's best for quick, temporary admin assignments.
- Access the Server Console:
- If you're on the server, press F1 to open the console.
- If you're accessing the server remotely (via a hosting panel or SSH), use the provided console interface.
- Add an Admin using the admin add command:
- Type the following command and press Enter:

- Example: To make a player with Steam64 ID 76561198000000000 a full admin:

- You should see a confirmation message in the console.
- To Remove an Admin:
- Use the admin remove command:

- Example:

Note: While some server versions might save these changes, it's generally safer to use Method 1 for permanent admin assignments. If you use this method and the admin status is lost after a restart, revert to editing serveradmin.xml.
Verifying Admin Status
Once you've added an admin, the player can verify their status by:
- Attempting to use an admin command (e.g., cm for creative menu, if enabled for their permission level)
- Typing lp in the console (if the Alloc server tools are installed) to see their permission level.
Important Considerations
- Steam64 ID is Critical: Always use the correct Steam64 ID. A wrong ID means the wrong player (or no player) gets admin access.
- Server Restart: For serveradmin.xml changes, a full server restart is mandatory.
- Security: Only grant admin access to trusted individuals. Misuse of admin commands can severely impact your server and player experience.
- Backup: Always back up your serveradmin.xml file before making changes.
Still have some questions about adding an admin to a 7 Days To Die server?
Don't hesitate to open a support ticket for further assistance!
By: Exequiel P
Updated on: 12/11/2025
Thank you!