How To Add Admin To Soulmask Server
Running a Soulmask server means you’ll sometimes need to take control of administrative functions, such as managing players, adjusting settings, or fixing bugs. To do that, you must set an admin password to gain access to the GM (Game Master or admin) panel. This guide will show you exactly how to set your admin password on your Soulmask server and use admin commands.
Using Admin Mode On A Soulmask Server
Creating An Admin Password
Your admin password is the key to controlling the server. Choose a secure password that only you and trusted administrators know.
- Log in to the Apollo Panel and ensure that your Soulmask server is offline.
- Go to the Startup Tab, then under the "Admin Password" setting, set the password that will be used to access admin mode.
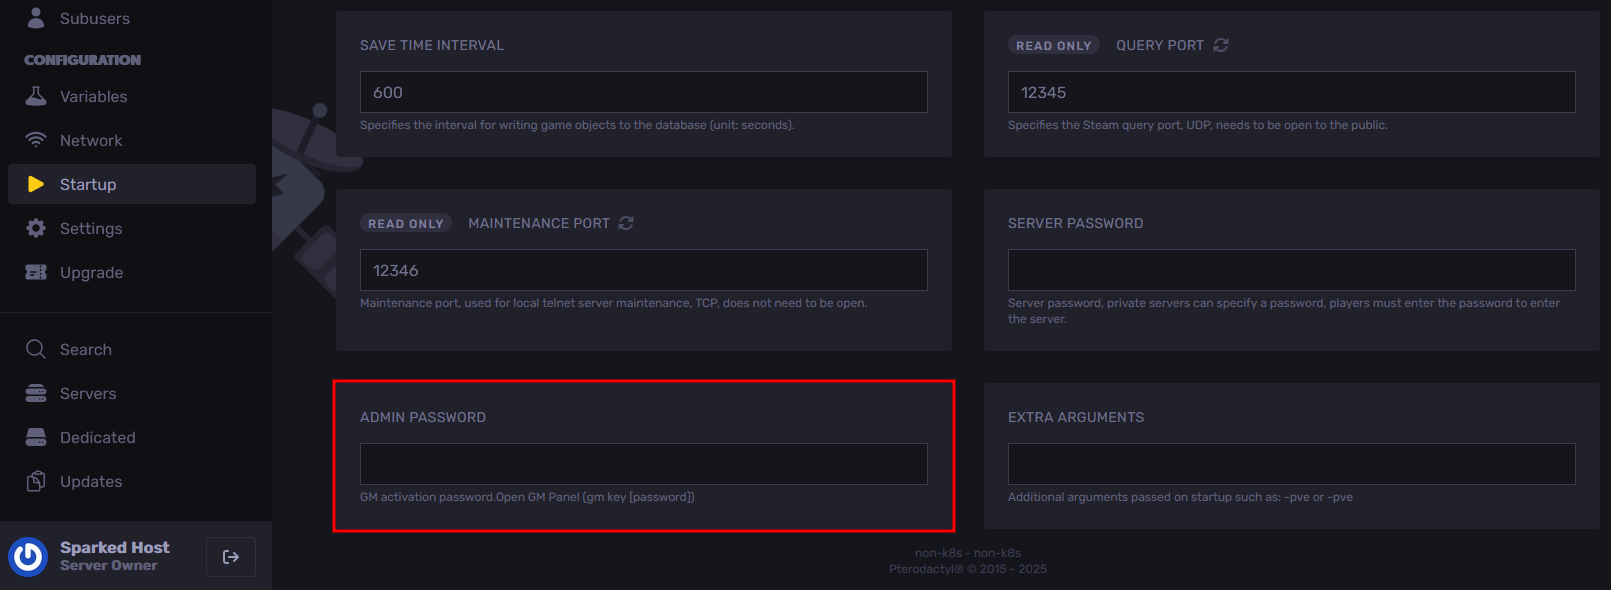
- Start the server, and you will now be able to use the new admin password to access admin mode.
Accessing Console Commands
- Launch Soulmask and join your server.
- Press the `~` (tilde) key to open the console.
- You can now enter commands directly into this console once admin mode is activated.
If the tilde key doesn’t work, check your keyboard layout, as it can vary depending on your system.
Entering Admin Mode
Once your password is set and your server is running, follow these steps to activate admin mode in-game:
- Join your server and open the console using the ~ key.
- Enter the following command with "<Admin Password>" replaced with your admin password that you have set in the Startup Tab:
GM key <Admin Password>
- You will now have access to the GM (Game Master or admin) panel, wherein you can do several things, such as summoning creatures, giving items, etc.
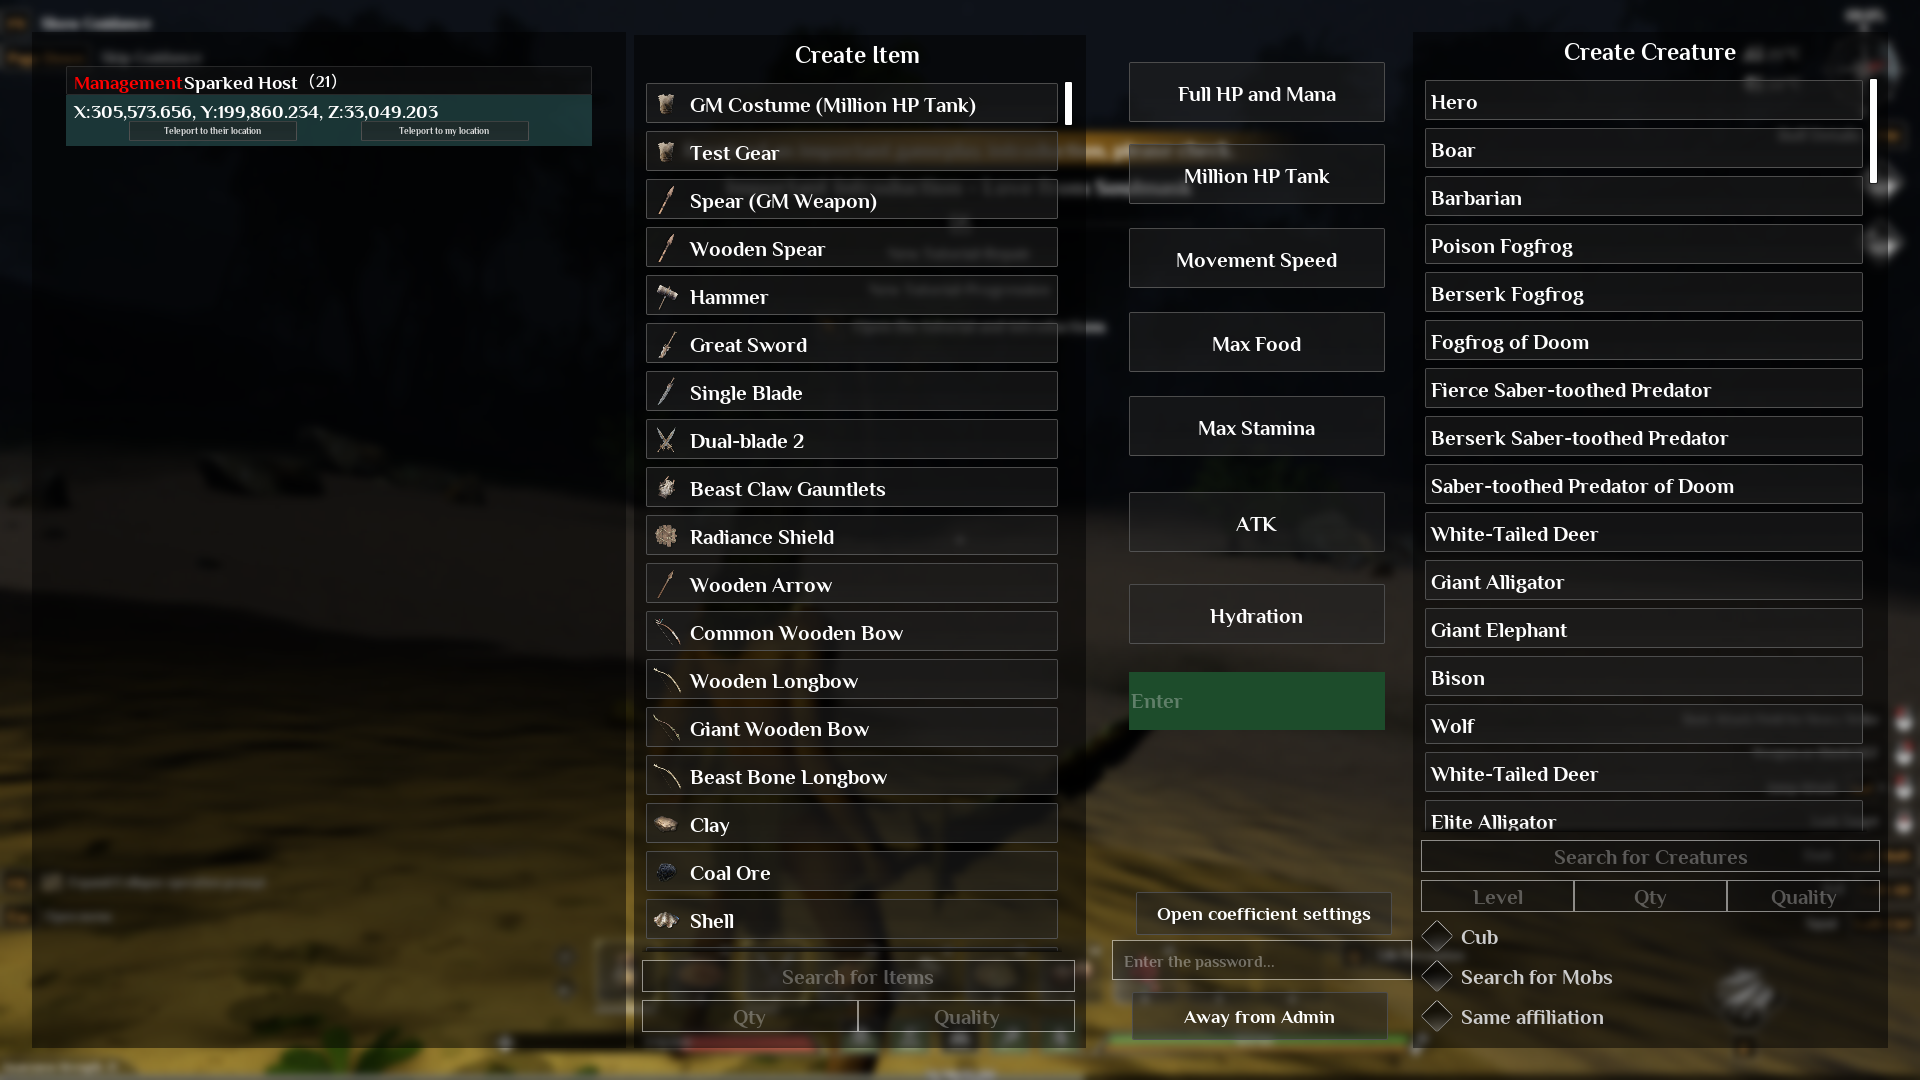
All Soulmask Server Console Commands Explained
gm key <Admin Password>
This command opens the GM (Game Master or admin) panel. Type `gm key <Admin Password>` in the console to authenticate yourself as an administrator. Only users who know the password set in the Startup Tab on the Apollo Panel can use it.
AddServerPermissionList <Permission Type> <Steam ID>
Adds a specific permission for a player based on their Steam ID. It can be used to ban, mute, or grant administrative rights depending on the permission_type value. For example, using `AddServerPermissionList 1 <steamID>` bans that player.
RemoveServerPermissionList <permission_type> <steamID>
Removes a permission previously assigned to a player. For instance, RemoveServerPermissionList 1 <steamID> unbans a player, while RemoveServerPermissionList 4 <steamID> unmutes them.
gm go <x> <y> <z>
Teleports you to the specified coordinates. You can use this to move instantly to any location in the world by defining the X, Y, and Z values.
gm add_exp <value>
Adds a chosen amount of general experience (XP) to your character. This helps you level up quickly for testing or administrative purposes.
gm add_mask_exp <value>
Adds mask-related experience to your character, boosting mask progression without the need to earn it naturally.
gm add_hunting_exp <value>
Gives you hunting experience points. This is useful if you want to increase your hunting level or test related mechanics.
gm follow_player_view <0 or 1>
Toggles camera follow mode. Setting it to `1` enables your view to follow the targeted player, while setting it to `0` disables this feature.
gm show_map
Reveals the entire map for your character. Use this command if you want to explore or test different regions without discovery restrictions.
gm unlock_techs
Unlocks all technologies in the tech tree, allowing access to every craftable item or upgrade instantly.
Debuginfo <0 or 1>
Toggles debug info that can be seen. Setting it to `1` displays performance and player information such as FPS, player count, and server statistics, while setting it to `0` hides the debug info.
gm refresh_vegetation_in_range <radius>
Refreshes or reloads vegetation within a specified radius. This helps fix missing or glitched plants and trees in the area.
gm destroy_vegetation_in_range <radius>
Removes all vegetation within the specified radius around you. It helps clear land or troubleshoot environmental issues.
gm join_tribe <index>
Forces your character to join a tribe based on its index number. Each number represents a different tribe on the server.
gm take_over_target_tribe
Allows you to take control of a targeted tribe, effectively making you its leader. Aim at a tribe member before using the command.
gm DeleteGuild <Index>
Deletes the specified guild or tribe based on its index number. Use this command carefully, as it cannot be undone.
gm BaoCun
Performs a manual save of the world and server data. This is useful for forcing a save before making major changes.
gm reset_abilities
Resets your ability or skill points, allowing you to redistribute them freely afterward.
gm recruit
Recruits the NPC you are currently aiming at. This instantly adds that character to your tribe or following group.
gm clear_all_npcs
Removes all NPCs from the world. This can help reduce lag or reset world state, but should be used with caution.
gm ShowInfo <0 or 1>
- `gm ShowInfo 1` displays your own character stats, such as attributes and skills.
- `gm ShowInfo 0` shows the same details for the target you are looking at.
gm set_all_pros_level <value>
Sets all proficiency levels to the same chosen value. This is useful for testing or balancing gameplay quickly.
gm unlock_nodes
Unlocks all mask or progression nodes for your character, bypassing normal progression requirements.
gm show_fever / gm clear_fever / gm add_fever <value>
- `gm show_fever` displays invasion heat data for your current area.
- `gm clear_fever` resets the invasion heat to zero.
- `gm add_fever <value>` increases invasion heat by a specific amount, up to a maximum of 8,000,000.
GPS
Displays your current coordinates in the game world. It’s helpful for teleportation or sharing specific locations.
gm SetAttr YinShen <0 or 1>
Turns your character invisible. Setting it to `1` makes your character invisible to others, while setting it to `0` disables invisibility, returning you to normal visibility.
Still have some questions about adding an admin to a Soulmask Server?
Don't hesitate to reach out to our support team! We're available 24/7 to assist!
By: Alecz R.
Updated on: 13/10/2025
Thank you!