How To Add Mods To 7 Days To Die Server
Adding mods to your 7 Days to Die server is a great way to customize gameplay, introduce new challenges, or completely overhaul the experience. Whether you're looking to enhance visuals, add weapons, or tweak AI behavior, the process is simple and rewarding. With just a few steps, you can turn a standard server into a unique adventure tailored to your community.
Don't already host with us? 10,000+ server owners trust Sparked Host for servers on games like 7 Days To Die. Claim your server savings to get higher performance at less $ per month.
Downloading Mods
The main method to download external mods for 7 Days To Die that isn't the Steam Workshop is the 7 Days To Die Mods community. Visit <https://7daystodiemods.com/>, pick a mod you want to download and install it on your computer.
Installing Mods On A 7 Days To Die Server
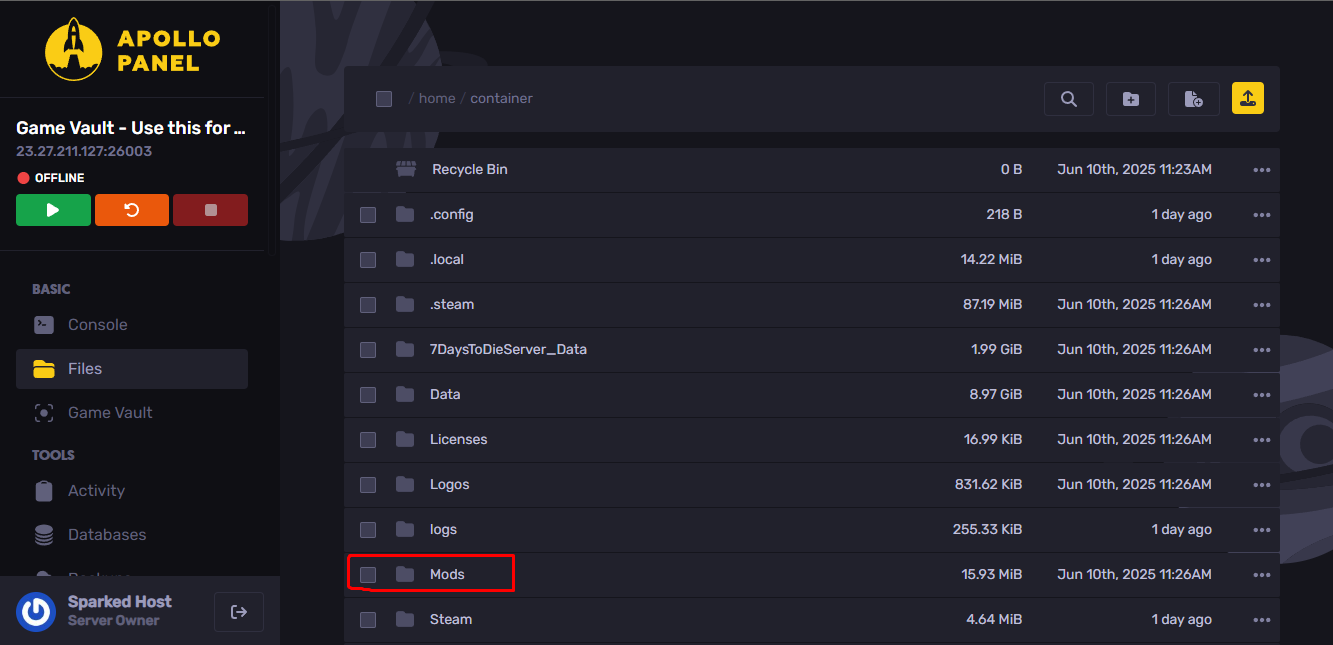
The mods are installed by placing their folders into a special Mods directory within your 7 Days To Die server's root folder.
- Access your server's control panel or console and ensure the server is completely shut down.
- Create a Mods Folder (if it doesn't exist).
- Extract and Upload Files:
- Locate the files you downloaded from 7 Days To Die Mods.
- Extract the archive: Inside the archive, you'll typically find one or more folders (e.g., ModName, AnotherMod). Each of these folders represents a single mod.

- Upload/Copy the mod folders:
- Upload the extracted mod folders (not the .zip file itself) into the Mods folder on your server using your file manager or FTP client.
- Important: Each mod download should have its own subfolder within the Mods folder. For example, if you download "MyMod.zip", extract it, and find a folder named "MyMod", you should place 7DaysToDieServer\Mods\MyMod\
- Start Your 7 Days To Die Server:
- Once all mod folders are in the Mods directory, start your server.
- The server will automatically detect and load the mod. You can often see "Loading Mod" messages in the server console during startup.
- Player Installation:
- All players connecting to your server must have the exact same mod installed on their game client.
Installing 7 Days To Die Mods On Your Local PC Client
To install mods on your computer:
- Locate Your Server Directory:
- Self-hosted: Navigate to where your 7 Days To Die dedicated server is installed. The default path is often C:\Program Files (x86)\Steam\steamapps\common\7 Days To Die Dedicated Server.
- Create a Mods Folder (if it doesn't exist)
- Download the mod you want to install. They usually come in a .zip or .rar archive.
- Extract the archive: Inside the archive, you'll typically find one or more folders (e.g., ModName, AnotherMod) Each of these folders represents a single mod. Use a tool like 7ZIP or WinRar to extract this folder.
- Self-hosted: Copy the extracted mod folders directly into the Mods folder.
- Once all mod folders are in the Mods directory, start your server.
- The server will automatically detect and load the mods. You can often see "Loading Modlets" messages in the server console during startup.
Still have some questions about adding mods to a 7 Days To Die server?
Don't hesitate to open a support ticket for further assistance!
By Exequiel P.
Updated on: 12/11/2025
Thank you!