How to Add Mods to Arma Reforger Server
Looking to spice up your Arma Reforger server with some mods? You’re in the right place. Mods are an awesome way to change up gameplay, add new content, and keep your server feeling fresh and fun. From new maps and gear to total game overhauls, there’s a lot you can do once you know how to get all the mods.
Here’s what we’ll walk through:
- Finding Mods For Your Arma Reforger Server
- Finding Mod IDs
- Adding Mod IDs to Your Configuration File
Step 1: Find Your Workshop Mods
Lets find some workshop mod ids. For us we will be installing Better Tracers. Although you can find countless others on the workshop webpage.
Step 2: Find The Workshop Mod's ID
Lets copy and paste our workshop mod id. We will need it for the next step.

Adding Your Workshop Mods To Your Arma Reforger
Next, navigate to the container/config.json file. When adding mods to your Arma Reforger server, there’s no need to manually download them—instead, simply reference the mod by its ID in your configuration file. By doing this, your Arma Reforger server will automatically fetch and apply the correct mod during startup.
Double Check Your Config
Your configuration should look similar to the example below. If the mods section isn't already present in the file, you’ll need to add it manually. Be sure to double-check your syntax to avoid any startup errors.
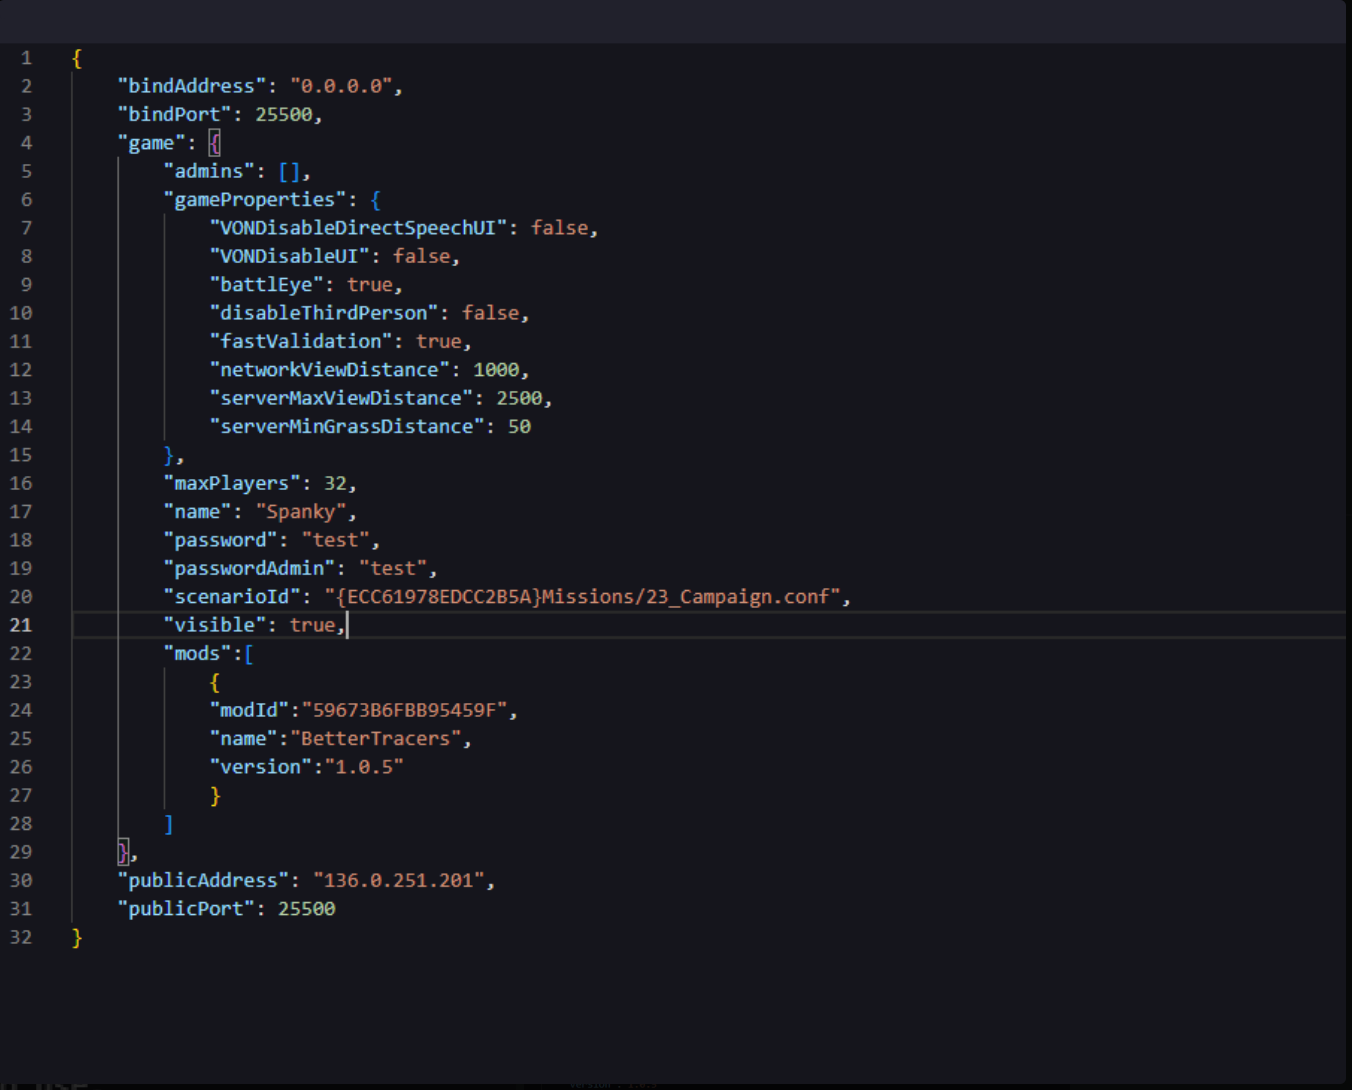
Take note of the mods section—our example mod has already been added. For each additional mod, you'll need to replicate the template below and fill it in with the appropriate details, which can be found on the mod’s Workshop page or download listing.
The template can be found below:
{
"modId":
"name":
"version"
}
Ensure each entry is accurate to prevent loading issues during server startup. This includes double-checking the mod ID, name, and any other required fields such as version or dependencies. Even a small typo or missing comma in your JSON file can cause the server to fail to start or ignore the mod entirely. Use a tool like JSONLint to make sure that your file is correctly setup.
Below is an example of a correctly formatted file:
{
"modId":"59673B6FBB95459F",
"name":"BetterTracers",
"version""1.0.5"
}
Save the file, then restart your server to apply the changes. If the mods were installed successfully, you’ll see confirmation messages in the server console during startup.

You’ve successfully installed a Workshop mod on your Arma Reforger server using its Mod ID. To add more mods, simply repeat the same steps for each additional mod.
Having Issues With Mod Installation?
If you encounter issues during mod installation, try clearing the /tmp directory and restarting the process. When installing a large number of mods at once, it’s not uncommon for the initial attempt to fail—restarting often resolves the issue.
Still have questions?
Don't hesitate to reach out to our support team. We're available 24/7 to help!
By: Cayden D.
Edited By: Mason Baker
Updated on: 21/07/2025
Thank you!