How To Backup 7 Days To Die Server
Regularly backing up your 7 Days To Die server is crucial for protecting your progress, player data, and server configuration. Whether you're hosting the server yourself or using a hosting provider, unexpected issues like corrupted files, accidental deletions, or mod conflicts can lead to significant data loss. This guide will walk you through the essential steps and best practices for backing up your 7 Days To Die server.
Don't already host with us? 10,000+ server owners trust Sparked Host for servers on games like 7 Days To Die. Claim your server savings to get higher performance at less $ per month.
Why is Backing Up Your 7 Days To Die Server Important
- Data Protection: Safeguard your world progress, player inventories, base builds, and all server settings.
- Disaster Recovery: Quickly restore your server to a previous working state in case of crashes, data corruption, or failed updates.
- Experimentation: Allows you to test new mods or configurations without fear of permanently damaging your main server.
- Migration: Essential when moving your server to a new host or machine
Method 1: Manual Backup
This is the most straightforward method and works for both self-hosted servers and many hosting providers (FTP/SFTP).
- Stop Your 7 Days To Die Server:
- Crucial Step: Never attempt to back up a running server. Files can be in use or in an inconsistent state, leading to corrupted backups.
- Access your server's control panel or console and stop the server completely. Wait for it to fully shut down.
- Locate Your Server Directory:
- Hosting Provider: Use your hosting provider's file manager or an FTP/SFTP client (like FileZilla) to connect to your server and navigate to its root directory.
- Identify Files/Folders to Backup:
- As mentioned above, focus on the Data\Worlds\ folder and your main .xml configuration files (serverconfig.xml, serveradmin.xml).
- Easiest approach: Copy the entire 7 Days To Die Dedicated Server folder.
- Copy the Files:
- For hosting provider: Download the selected folders/files using your control panel's file manager or an FTP/SFTP client to your local computer.
- Organize Your Backups:
- Create a clear folder structure for your backups. A good practice is to name folders by date: 7DTD_Backup_YYYY-MM-DD_HHMM.
- Example: 7DTD_Backup_2025-06-02_2230.
- Restart your Server:
- Once the backup is complete, you can restart your 7 Days To Die server.
Method 2: Backup Tool
This is often the easiest method if available.
- Log in to the control panel.
- Look for options like "Backups".
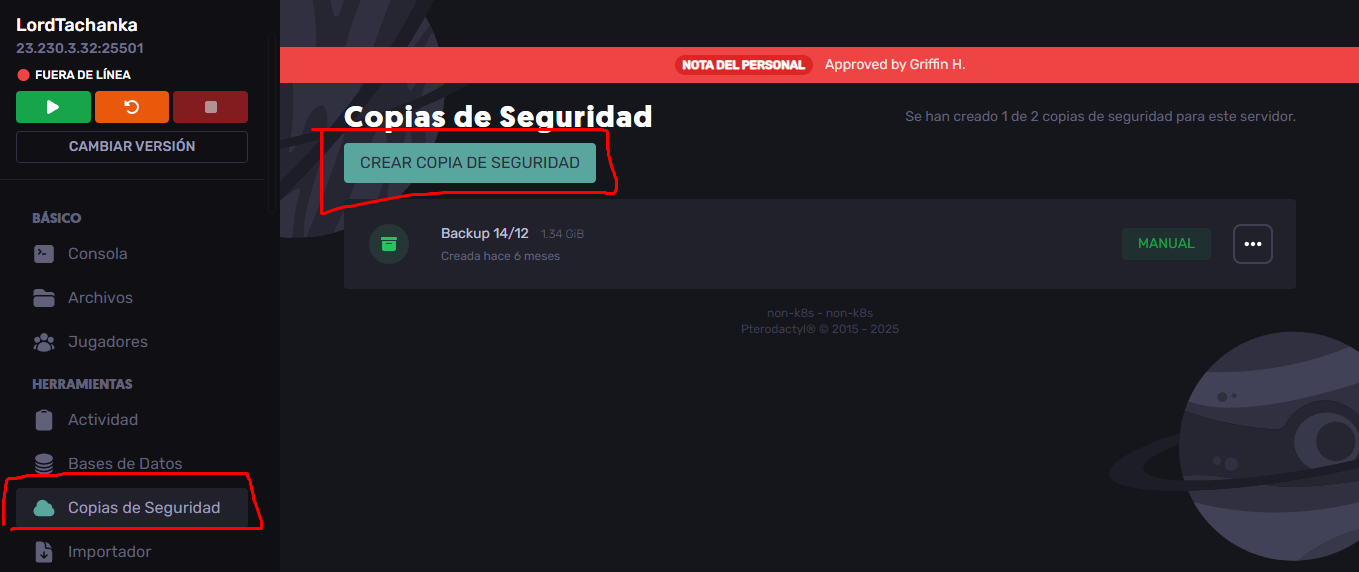
- Follow the on-screen instructions to create a new backup.
- Finally, click on "create backup".
It's highly recommended to download the backup files to your local computer, rather than relying solely on the host's storage. This provides an extra layer of security.
Alternative Method: Using The Backup Mod
You can configure the mod by modifying the ‘settings.json’ file, or you can also use the FilUnderscore’s Mod Manager. If you changed the configuration when you were in game, you should re-enter to your world to apply changed settings.
By default, your backups for each save will be saved in the ‘%AppData%/Roaming/7DaysToDie/Backups/%WorldName%/%SaveName%‘ directory (on windows). And your archived backups for each save will be saved in the ‘%AppData%/Roaming/7DaysToDie/Archive/%WorldName%/%SaveName%‘ folder (on windows).
Important Commands
You can use the ‘backup‘ command or its shortened version – the ‘bp‘ command.
- ‘backup‘ – perform a forceful backup.
- ‘backup info‘ – show the current configuration of the mod.
- ‘backup list‘ – show all available backups.
- ‘backup restore‘ – restore a save from a backup.
- ‘backup delete‘ – delete a backup.
- ‘backup start‘ – start an AutoBackup process (even if disabled in settings.json).
- ‘backup stop‘ – stop the current AutoBackup process.
Installation
- Extract the downloaded .zip archive
- Move the extracted ‘BackupMod’ folder into your ‘Mods’ folder
Compatibility
Required game version: V1.1+
EAC Compatibility
Server only. To load in single-player mode, you must disable EAC.
Still have some questions about backing up a 7 Days To Die server?
Don't hesitate to open a support ticket for further assistance!
Updated on: 12/11/2025
Thank you!