How to Host an Arma Reforger Server
Looking to dive into multiplayer with Arma Reforger? Hosting your own server for Arma Reforger unlocks limitless possibilities—from customizing game modes and missions to building a dedicated community of players.
Method 1: Using Sparked Host's Arma Reforger Server Hosting
Sparked Host offers an easy, beginner-friendly solution for Arma Reforger server hosting without the hassle of manual setup. Ideal for both beginners and experienced admins, Sparked Host simplifies server management so you can focus more on gameplay and less on technical details.
Why Sparked Host?
- Enterprise Hardware
- Budget Friendly
- 24/7 Professional Support
- Premium Locations
- Instant Setup
- Bulletproof DDoS Protection
To setup Arma Reforger Server Hosting with Sparked Host, go to https://sparkedhost.com/arma-reforger-hosting and pick a package. Complete the checkout process to receive your sign in credentials and start on your server in just 5 minutes (or less!)
Method 2: Hosting on Ubuntu (Linux)
If you want full control over your Arma Reforger server hosting, setting it up on a VPS or dedicated server is a great option. This guide walks you through installing SteamCMD, setting up the Arma Reforger server, configuring port forwarding, configuring the necessary software and starting the server.
Note: Do not host your own Arma Reforger server on your own computer
Arma Reforger Server Hosting Requirements
To host an Arma Reforger server, you need:
- A VPS or dedicated server running Ubuntu 20.04+ or Windows Server 2019/2022
- Root/Admin access to your VPS
- At least 8GB RAM and a quad-core CPU (recommended)
Install steamcmd
SteamCMD is required to download and update the Arma Reforger server files.
- Update the system:
sudo apt update && sudo apt upgrade -y
- Install dependencies:
sudo apt install -y steamcmd
- Create a dedicated user for the server (optional but recommended):
sudo useradd -m -s /bin/bash armareforger
- Switch to the new user and create a directory for the server:
sudo su - armareforger mkdir ~/arma_reforger cd ~/arma_reforger
- Download and install Arma Reforger Server:
steamcmd +login anonymous +force_install_dir ~/arma_reforger +app_update 1874900 validate +quit
Port Forwarding on Ubuntu
To start an Arma Reforger server, you need to open the required ports to allow connections:
- Open ports in the firewall:
sudo ufw allow 2001/udp
    sudo ufw allow 2002/udp
    sudo ufw allow 17777/udp
    sudo ufw enable
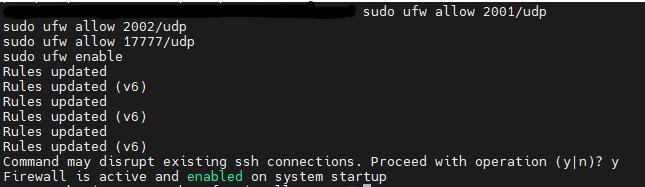
- Verify the firewall rules:
sudo ufw statusConfiguring Your Arma Reforger Server
To configure an Arma Reforger server on a Linux VPS:
- Navigate to the configuration file:
cd ~/arma_reforger
- Edit the server configuration file:
nano config.json
- Modify the following settings to match your server preferences:
{
        "name": "My Arma Reforger Server",
        "maxPlayers": 32,
        "gameMaster": false,
        "password": "yourpassword",
        "adminPassword": "adminpass",
        "ports": {
            "gamePort": 2001,
            "queryPort": 17777
        }
    }
- Save and exit (CTRL+X, then Y, then Enter).
Start Your Arma Reforger Game Server
Run the following command to start your Arma Reforger server:
cd ~/arma_reforger ./server
To keep the server running even when logged out, use screen:
screen -S arma ./server
Method 2: Hosting on a Windows Game Server
Another method you can do is host your VPS on a Windows operating system.
Step 1: Install SteamCMD
- Download SteamCMD:
- Go to SteamCMD official page
- Download and extract [](http://steamcmd.zip)*steamcmd.zip*** into C:\steamcmd
- Open Command Prompt as Administrator and navigate to SteamCMD:
cd C:\steamcmd
- Install Arma Reforger Server:
steamcmd +login anonymous +force_install_dir C:\arma_reforger +app_update 1874900 validate +quit
Step 2: Port Forwarding on Windows Server
To setup the port forwarding for an Arma Reforger game server on Windows:
- Open Windows Defender Firewall
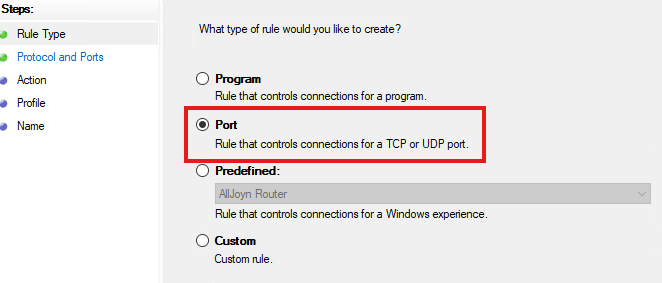
- Go to Inbound Rules > New Rule

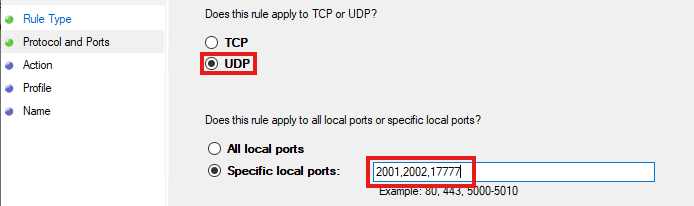
- Select Port > UDP > Enter Ports:
- 2001, 2002, 17777
- Allow the connection and apply the rule.
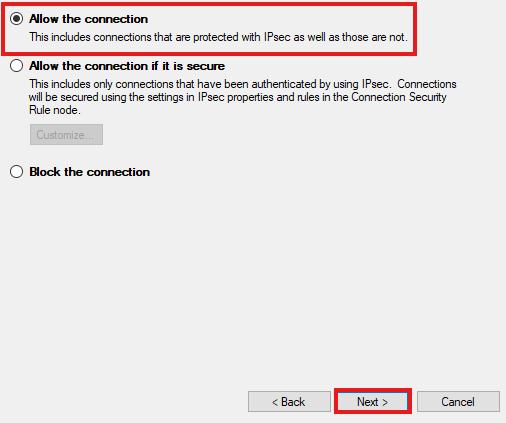
- Repeat for Outbound Rules.
Step 3: Configure the Arma Reforger Server
To configure an Arma Reforger server on a Windows VPS:
- Navigate to C:\arma_reforger and create/edit config.json
- Modify the game port and query port with your settings:
{
        "name": "Windows Arma Reforger Server",
        "maxPlayers": 32,
        "gameMaster": false,
        "password": "yourpassword",
        "adminPassword": "adminpass",
        "ports": {
            "gamePort": 2001,
            "queryPort": 17777
        }
    }
Step 4: Start Your Arma Reforger Server
- Open Command Prompt and run:
cd C:\arma_reforger server.exe
- To run it in the background, use Task Scheduler or NSSM.
Still have some questions?
Feel free to reach out or open a ticket with our support team. We're available 24/7 to assist!
Updated on: 21/07/2025
Thank you!