How To Make A Minecraft 1.17 Server
Hosting a Minecraft server for 1.17 enables you to create a multiplayer world and explore the first half of the Caves & Cliffs update. You can host a vanilla Minecraft survival server or customize it with datapacks and mods. This guide does it all—from downloading the Minecraft server jar to configuring your network and port number.
With a few quick steps, you’ll be able to open Minecraft, direct connect using your IP, and ensure your server starts properly.
Don't already host with us? 10,000+ server owners trust Sparked Host for lag-free Minecraft worlds. Claim your server savings to get higher performance at less $ per month.
Key Features of Version 1.17
Minecraft 1.17, or Caves & Cliffs: Part I, included new mobs, mechanics, and blocks but not world generation. It laid the foundation for future updates while offering useful features to vanilla Minecraft. The version is great for hosting a server focused on building, exploration, or testing.
- New mobs: Axolotls, Glow Squids, Goats
- New blocks: Copper, Amethyst, Deepslate, Tuff, Glow Lichen
- Lightning Rods to deflect strikes and protect builds
- Spyglass to zoom in on distant players or land
- Tinted Glass that darkens light but still is clear
- Raw ores: Iron, Copper, and Gold now drop as raw items
- Cave items: Dripstone, pointed dripstone, budding amethyst
All these features make Minecraft 1.17 a good choice for those who look for performance, creativity, and convenience in creating a Minecraft server.
How to Change Your Minecraft Server Version to 1.17
Thankfully, making a 1.17 Minecraft server on a Sparked Host server is easy. You can get started right away.
To make a Minecraft server that runs on version 1.17:
- Shutdown your Minecraft server.
- Select versions on the righthand side
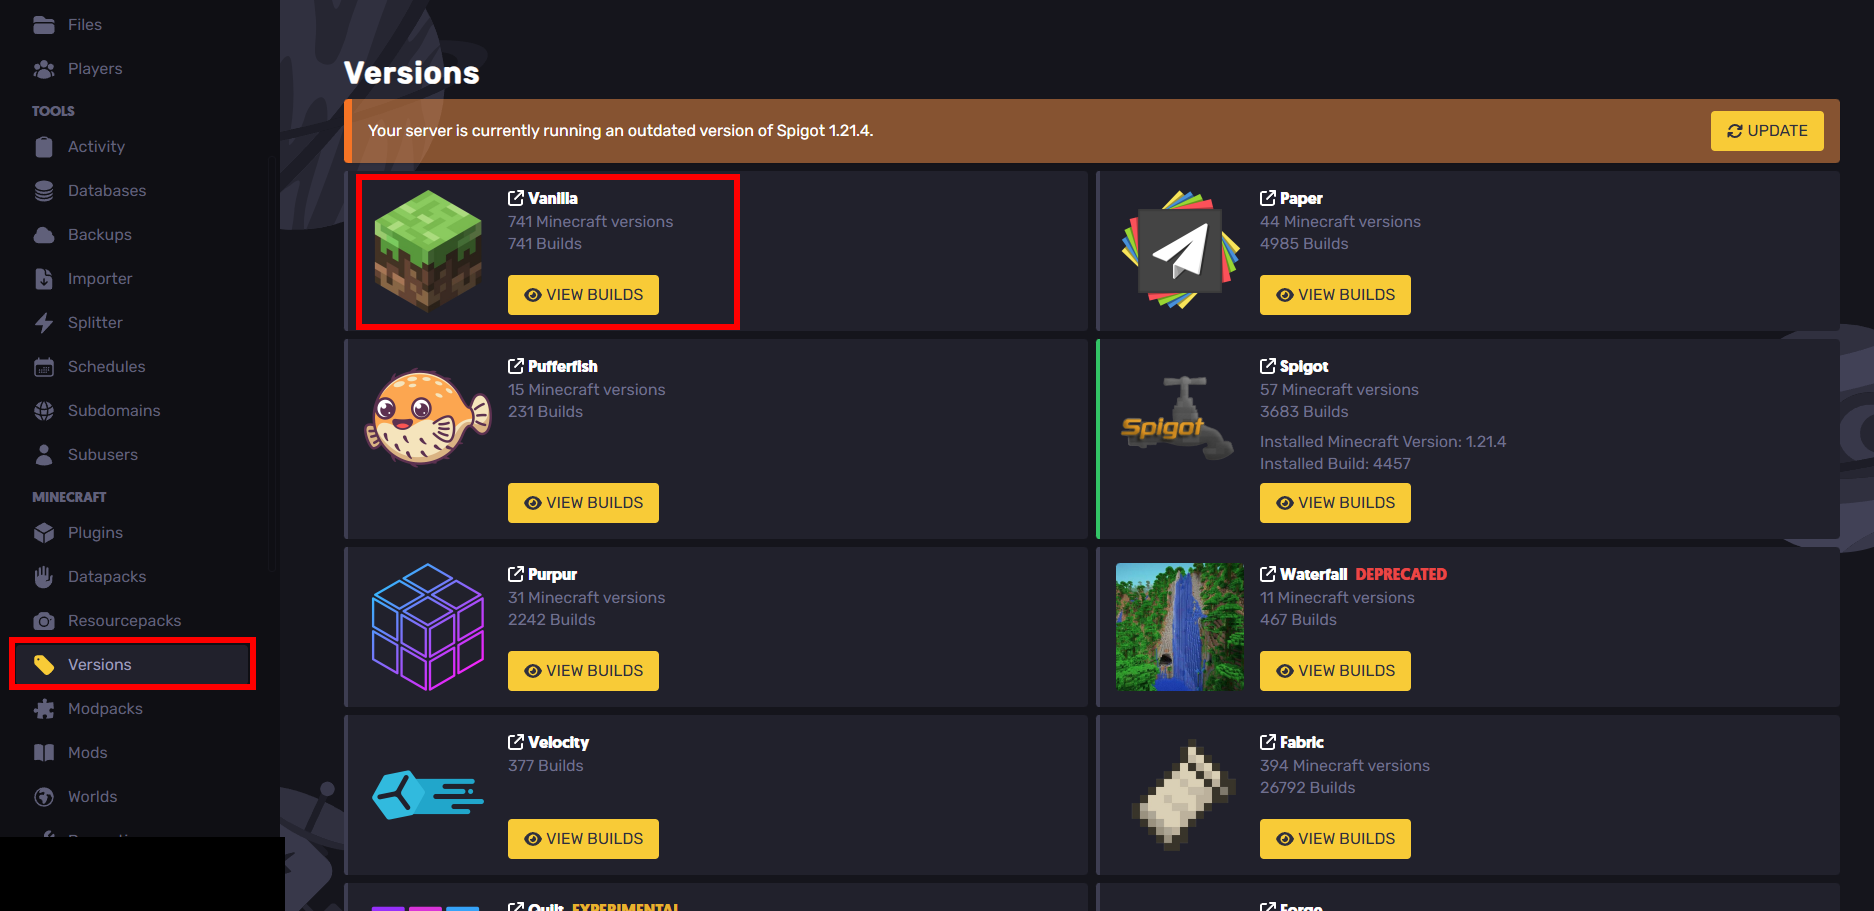
- Click on
VIEW BUILDSforVanilla
- Scroll down and select 1.17.2

- Press install. Do note that if you had another version before that you were playing on, you should backup those files.
- Restart your server
How to Make a Minecraft 1.17 Server on a VPS
Setting up Java
For this Minecraft version, we'll at least want a Java version of at least Java 17 installed. For this tutorial, we'll have the latest version of Java installed so that if you wanted to switch the version of your Minecraft server, you can.
Also there are some performance benefits with Java 24 (see here: https://www.youtube.com/watch?v=oTc16DAMTqg)
Here are some quick terms that are good to know:
- Java Virtual Machine (JVM) - Interprets the java code.
- Java Runtime Environment (JRE) - Used to run java programs, can't be used to create them. You'll need this to run your server. Includes the JVM as well.
- Java Development Kit (JDK) - Used to create java programs. Installing a JDK will include a JRE.
You might also have java already installed. Check if you do with the command:
java --version
If it's greater than 17 then you can skip this part of the tutorial. However, if you're running mods then you might want to consider lowering the version if the mod requires it.
For this tutorial, we'll install the lastest version of Java at https://www.oracle.com/java/technologies/downloads/.
Choose the download based off of what CPU architecture you have.
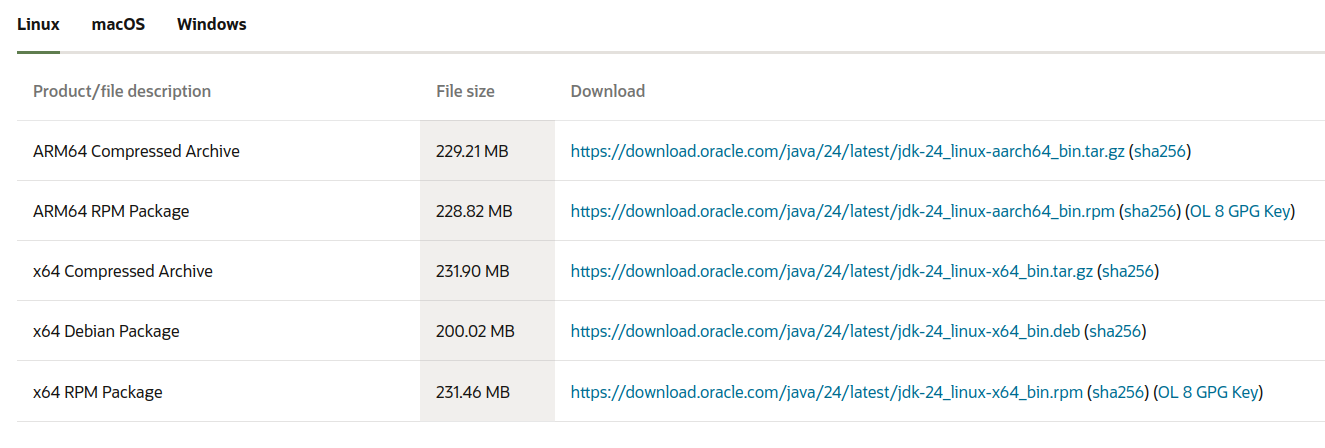
You can determine this with the command (in the image example: x86_64 = I would install the x64 compressed archive):
uname -p

Also, download the Compressed Archive type because it's easier to decompress (unless you know what you're doing of course).
Once it installs, decompress it with:
tar -xzvf jdk-24_linux-x64_bin.tar.gz
(Replace jdk-24linux-x64_bin.tar.gz with the file name)_
Although this is now installed, we'll need to add this to PATH. In my example, I already had java 21 installed and I'm replacing it with java 24.
First, I echoed the PATH environment variable:

echo $PATH
Next, I:
- Got the current directory
pwd
- Rewrote the path variable with what it was before except I removed and replaced the older java version with the newer one I installed.
/home/julian/.sdkman/candidates/java/current/bin:/usr/local/sbin:/usr/local/bin:/usr/sbin:/usr/bin:/sbin:/bin:/usr/games:/usr/local/games:/snap/bin:/snap/bin
became
/home/julian/Downloads/jdk-24/bin:/usr/local/sbin:/usr/local/bin:/usr/sbin:/usr/bin:/sbin:/bin:/usr/games:/usr/local/games:/snap/bin:/snap/bin
With the
export PATH=
command.
Be very careful with what you set this command to because it can mess up other commands if set improperly.
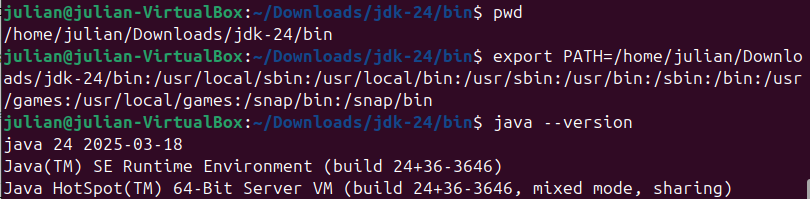
After that, check your version with:
java --version
If the path was set properly then it should work!
Downloading the 1.17 Server File
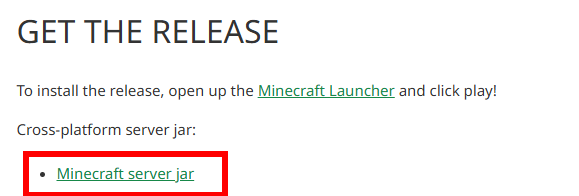
First, go to the minecraft website at https://feedback.minecraft.net/hc/en-us/articles/4402626897165-Minecraft-Caves-Cliffs-Part-1-1-17-Java and install the server jar
After installation, you can create a folder wherever and move the jar there.
mkdir server-1.17
mv server.jar ./server-1.17/server.jar
cd server-1.17

Starting Your Server
To get your minecraft server running, run the server jar file with java -jar server.jar (replace server.jar with the name of the server jar file if it's different). You can also run this command with the flag -nogui if you don't want any gui (say, you're running remotely).
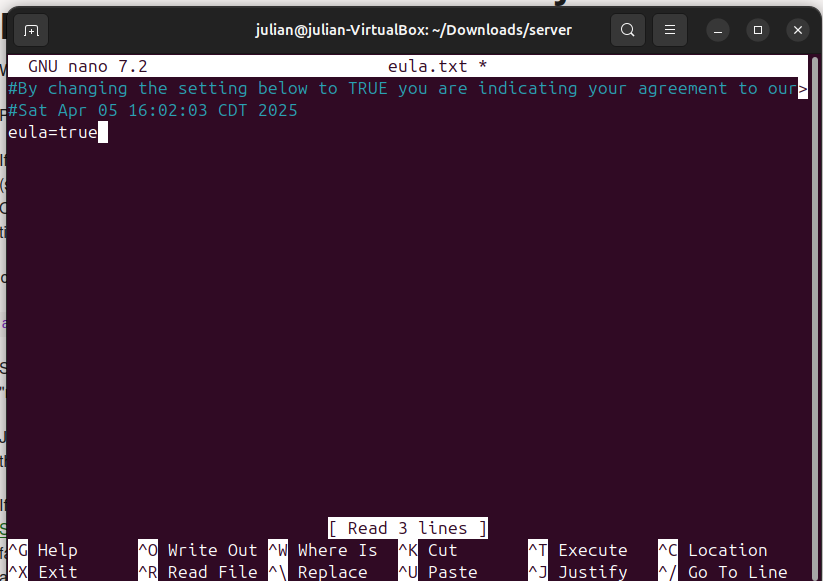
The Minecraft server requires you to accept the EULA (end user license agreement) before it can run:
[16:04:38] [ServerMain/INFO]: You need to agree to the EULA in order to run the server. Go to eula.txt for more info.
Edit the eula.txt file with your preferred editor and change the eula variable to true. I used nano (please don't get mad vim supremacists).
Changing Server Settings
- Shutdown your server by sending
stoporCtr+C
- Use
vimornanoto openserver.properties(your server properties file)
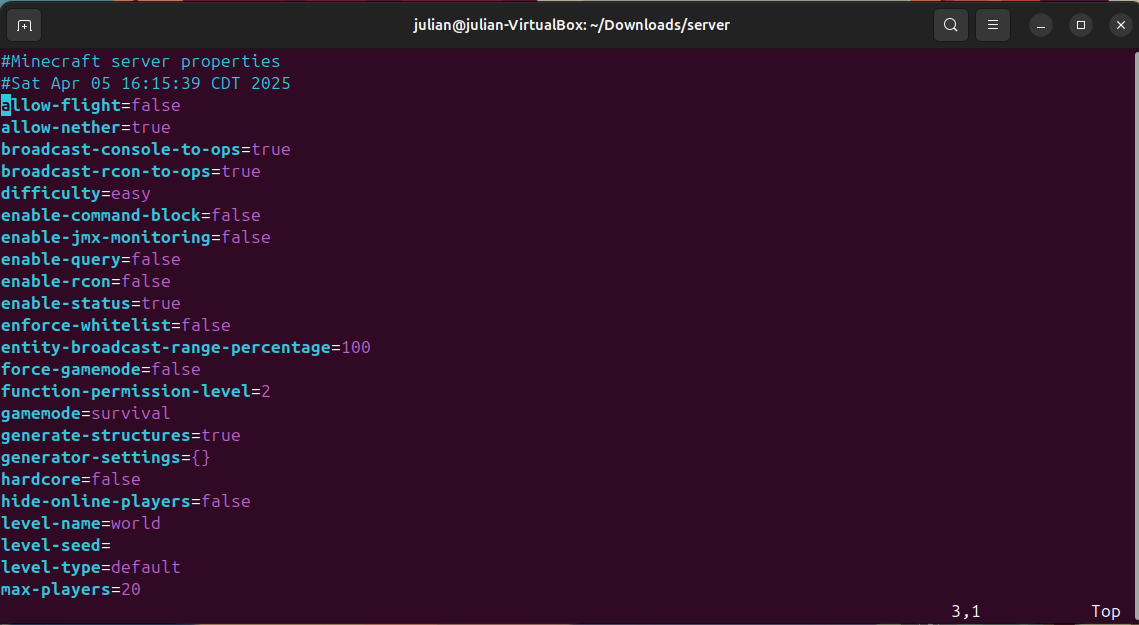
- Edit
- Save
- Restart the server
Setting Up Port Forwarding
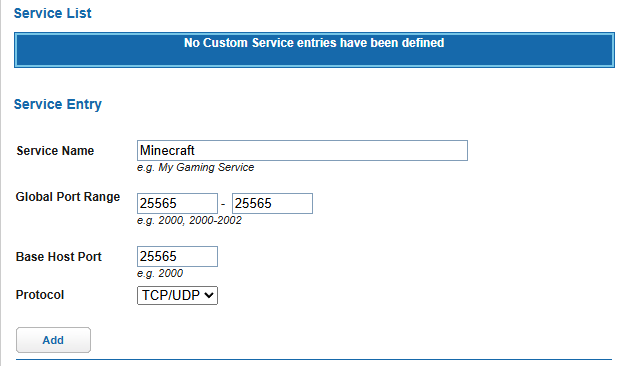
The default port for Minecraft servers is 25565. This can be changed in server.properties.
We'll also enable the firewall and add the port before we forward through the router. If your system is debian based the firewall is ufw (uncomplicated firewall):
sudo ufw enable
cat server.properties | grep server-port
sudo ufw allow 25565

(Of course, replace 25565 with the port number that server.properties has)
After the port has been added to the firewall, devices in your local network should be able to join (but not devices outside that!)
Access your router in the browser with your router's IP address. (This is the default gateway address when you type ipconfig on a windows machine or route -n on a linux machine)
For this tutorial I'm using an AT&T router.
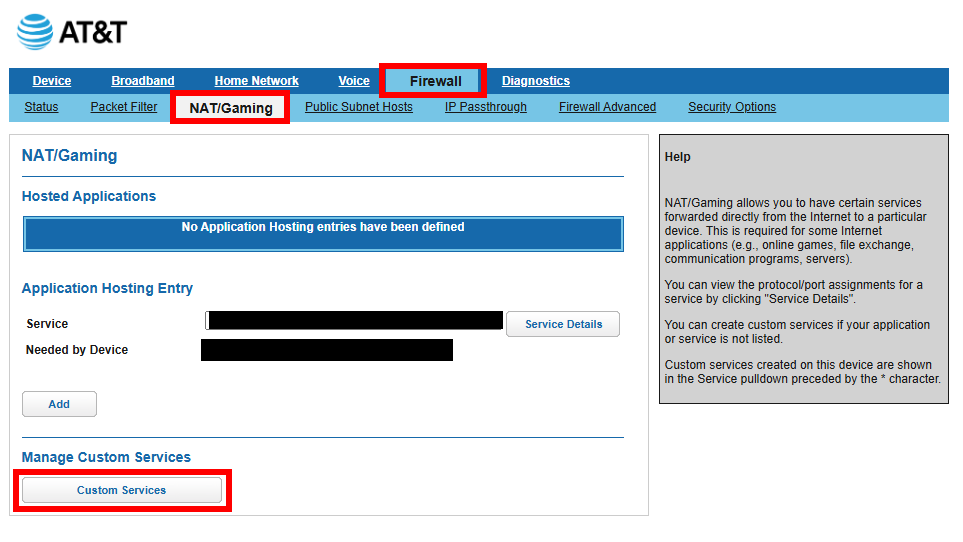
- Go to "Firewall"
- Go to NAT/Gaming
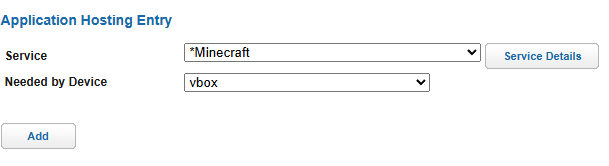
- Go to Custom Services and create a new service
- Add go back and then select the service as the custom service that you added. Then select the device that's running the server. I'm using a virtual machine which is why I selected vbox.
Joining Your 1.17 Minecraft Server
Joining the server is extremely easy.
- Open Minecraft version 1.17
- Obtain the local IP of the server with the command ( If you want to join from the SAME network) and press enter:
ifconfig | grep -Eo 'inet (addr:)?([0-9]*\.){3}[0-9]*' | grep -Eo '([0-9]*\.){3}[0-9]*' | grep -v '127.0.0.1'
(From StackOverflow)
If you want to join from a different network, go to https://whatismyipaddress.com/ and use that address.
- Open Minecraft, add the server IP under "add server", if it's a different port from the traditional 25565 for connections, then you'll need to append
:1234to the end of it (replace 1234 with the actual port of course)
- Join and connect to the server
Still have some questions?
If you had any issues or failed to do port fowarding, you can contact SparkedHost at https://sparkedhost.com/contact.
You can also join our discord server at https://discord.com/invite/sparked where you can get your problem fixed fast.
By: Julian T.
Updated on: 03/11/2025
Thank you!