How To Make A Python Discord Bot

A Discord bot is an automated bot that you can make in Discord (a messaging app) that allows you to create a bunch of commands in Discord Servers. You can create moderation tools, games, or anything that your heart desires. Discord bots also increase retention rates for new members.
Hello! I'm Julian, and I have a couple of years of experience in making Discord bots (which I'm quite passionate about), and I mainly work in Python. My passion project, Nestling Bot, is currently on 192 servers!
In this tutorial, I'll teach you the basics of getting your IDE (integrated development environment, don't worry if you don't know what this means yet) ready and getting your basic bot up and running!
I'll go over other topics such as:
- Getting your Discord bot in the backend (Discord developer portal)
- Setting up your own minimal bot
- Creating a basic Discord server for your own Discord bot in python
- Source control
Prerequisites
Before you make a Discord bot in Python, I heavily recommend learning the basics of Python first. However, if you already know Python, building a Discord Bot can heavily enhance your skills in Python, as learning how to use libraries like Discord.py or Pycord is essential to mastering the language.
Other than that, you don't need to learn anything else. If you don't have an IDE (integrated development environment) set up, I'll go over that later in this tutorial.
![]()
One can learn Python from various sources. I initially started with a book, but I'd recommend learning from YouTube tutorials, as (although anecdotal), that's where I learned the most. While learning, I would also create small mini projects on the way to solidify your skills.
I also recommend not purchasing any courses online as they're quite useless (my controversial take on it). You can obtain everything you need online for free.
A good article is the one by Free Code Camp: https://www.freecodecamp.org/news/learning-python-from-zero-to-hero-120ea540b567/. It should teach you the basics to get started.
Using an IDE
What is an IDE?
An IDE is an integrated development environment. If those words sound like random nonsense, fear not! An integrated development environment is a couple of things:
- A text editor (but better)
- Autocompletion (sometimes)
- A place to run your code by pressing a button
- An all-in-one tool
What IDE should I use?
There are a couple of different options:
- Web IDEs
- Language-specific IDEs
- General IDEs
Web IDEs
Web IDEs like Replit are super simple to use, and they use remote resources that aren't on your local machine. That means you can have a potato computer and you'll still be able to run your Discord bot decently fast (albeit, a Discord bot is not very resource-intensive to begin with). Replit is somewhat cost-effective if you have a free account.
If you have a decent computer, I'd stay away from these for now, as a Web IDE can be quite annoying to work with (latency issues + pricing).
Language-specific IDEs
Language-specific IDEs like PyCharm (my beloved) are incredibly good at those language-specific things. For example, PyCharm makes Python environment management easy. An environment is the place that holds all your Pip libraries (Pip is a library manager). If you want to be able to switch Python versions quickly, then PyCharm will be the easiest way to do so (without having to do a bunch of console commands).
There are also a lot of plugins available, but the most useful one that I've found is Reloadium. Reloadium is super awesome because you can reload functions while your bot is running! Normally, you'd have to restart your bot, which takes a while, but Reloadium saves you time. PyCharm does have a paywall, but I would not recommend purchasing it (just get the community edition).
General IDEs
What I mean by "general" is that it's not made for one particular language. VSCode, for example, can be used for almost any language.
Setting up the IDE
You can skip this section if you already have your IDE set up. For this tutorial, I'll be using PyCharm. If you're using a different IDE (like VS Code), the process should be somewhat similar, but you should learn how to create a basic project in that IDE before beginning.
- If you don't have PyCharm installed, you can download it from here. Make sure you download the Community Edition as it's quite good and FREE (scroll down a bit)! The other download is a little expensive for the pro version (and in my opinion, isn't worth purchasing).

- Open PyCharm and go to File (at the top) -> New project (it might look different if you're running PyCharm for the first time).
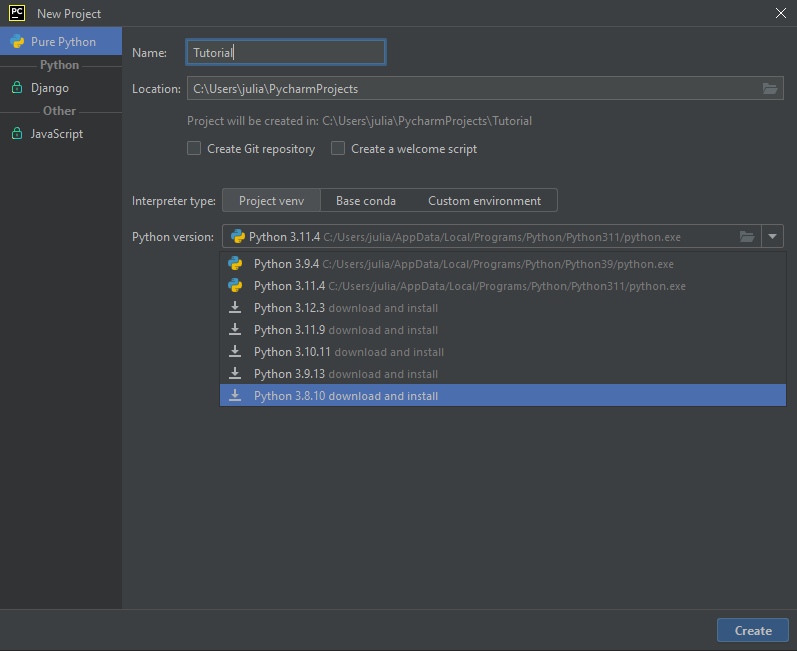
Set the name and location. For the interpreter type, select project venv unless you know how to use the other ones. For the Python version, use 3.8 or higher. If you don't have Python installed, you might have to install it manually here.
- After everything loads, you'll want to create the main Python file. Right click on the main folder -> new file -> Python file.
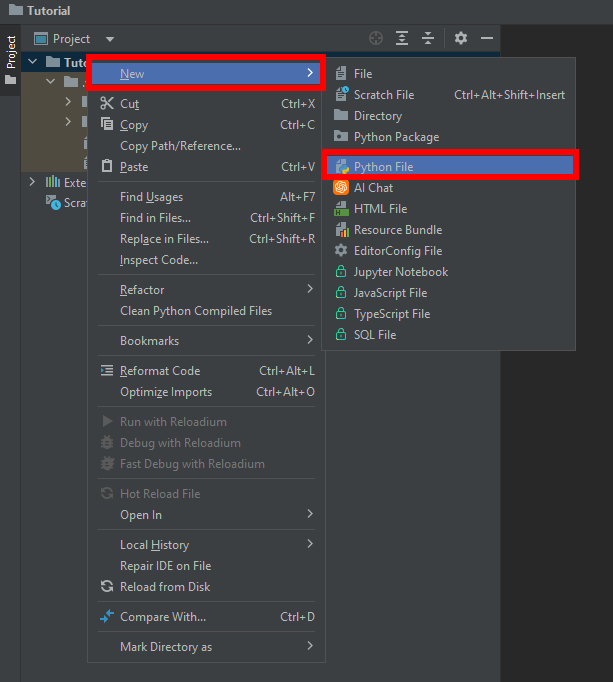
Call it main.
- This next part is optional, but quite useful to learn. In the top right, you'll see the current configuration of
Current fileif it hasn't been configured yet.

You'll want to change this to the main file. To do this, click Edit Configurations.
From there, you'll want to add a Python configuration.
Set the name to anything you want and change the script parameter to wherever your main.py is stored.
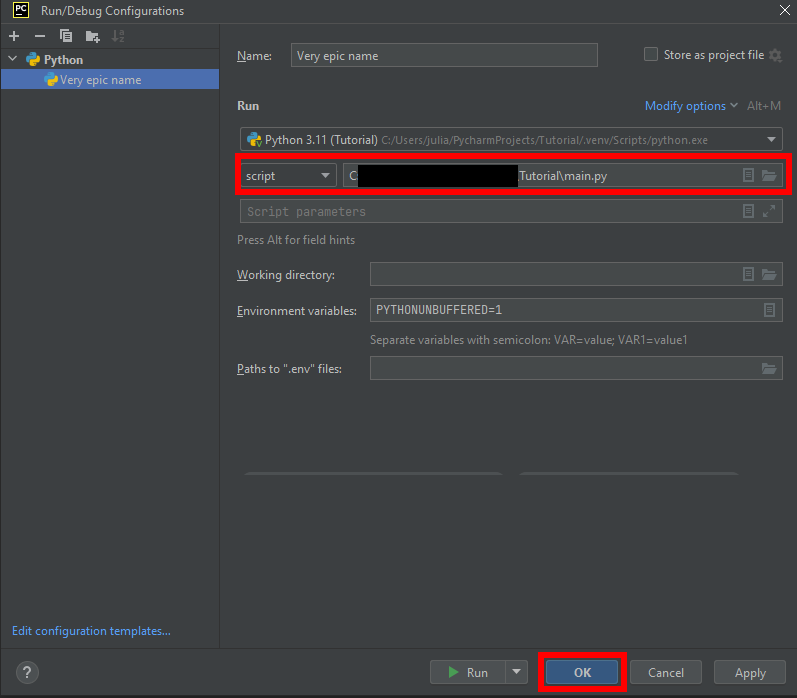
Click OK. Now your configuration should be ready!
Creating the Discord Bot on Discord's end
For any library, you need to create the Bot user on Discord's end so that you can invite it to servers and get a bot token. The token is used to authenticate yourself with Discord's backend.
This also means that you'll need a Discord account.
Setting up The Application and Token
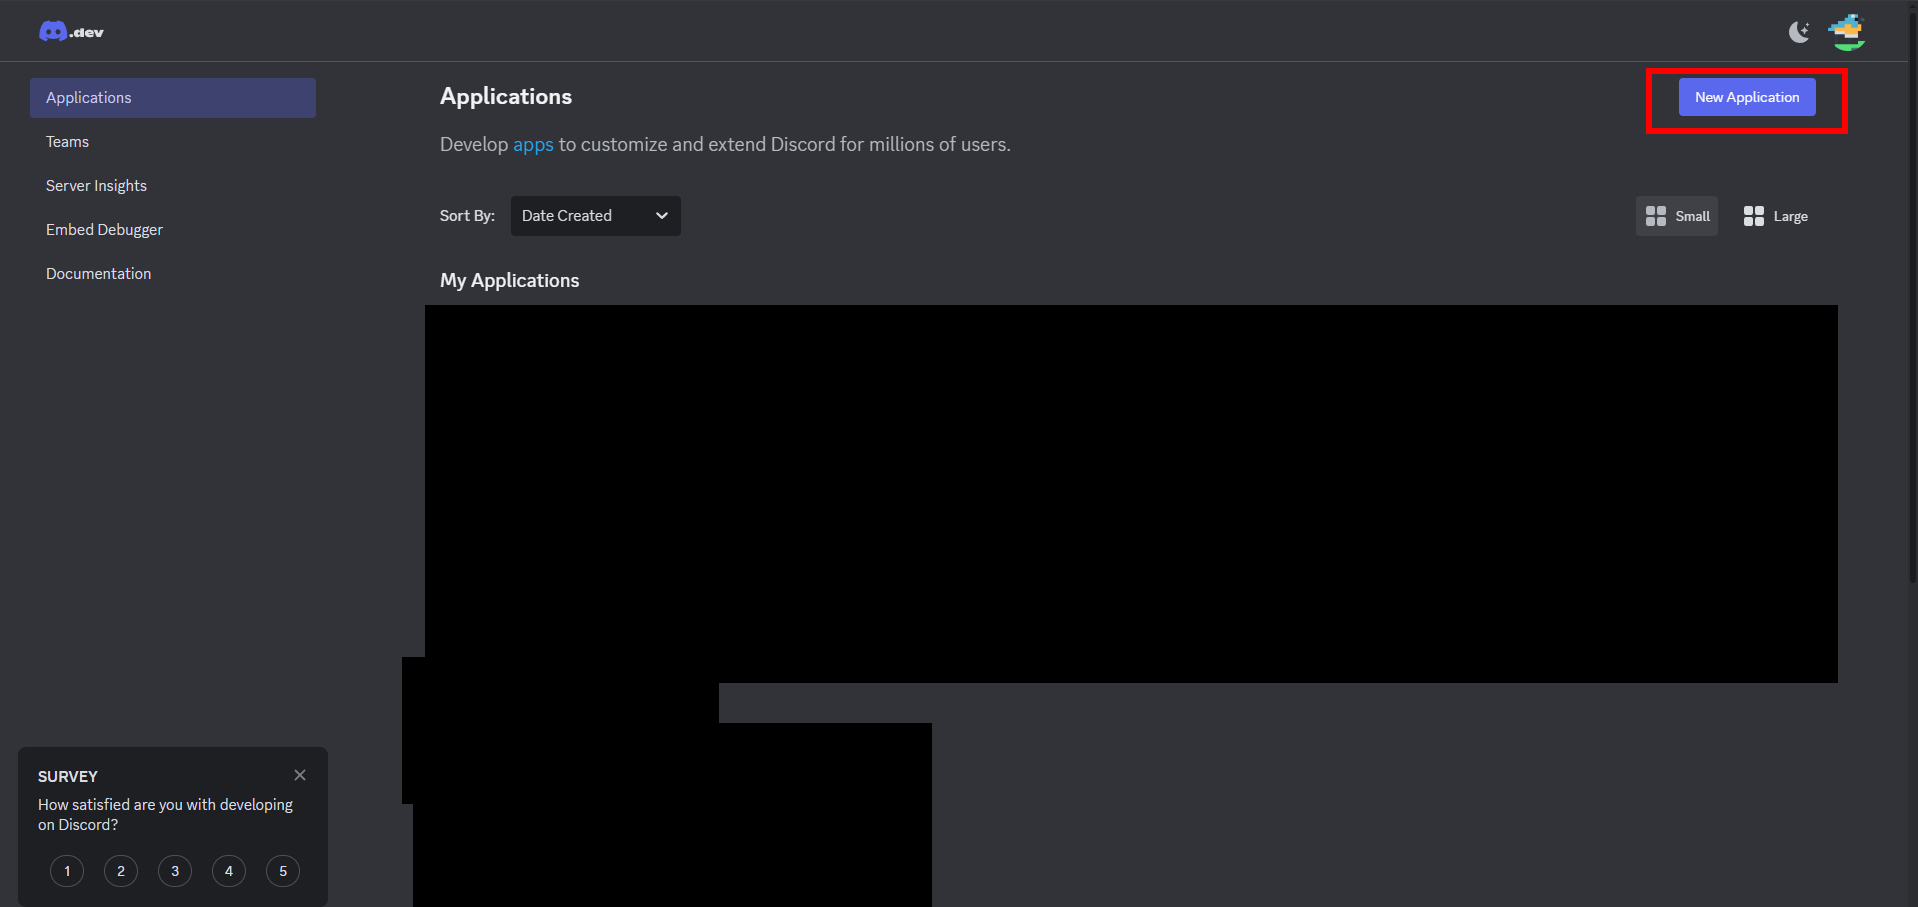
- Go to the Discord developer portal at https://discord.com/developers/applications
- Log in to your Discord account and press
New Application. TheNew Applicationpage will create your bot application.
- After you create your application, go to the
Botpage on the left-hand side. This new application will be linked to your Discord account.
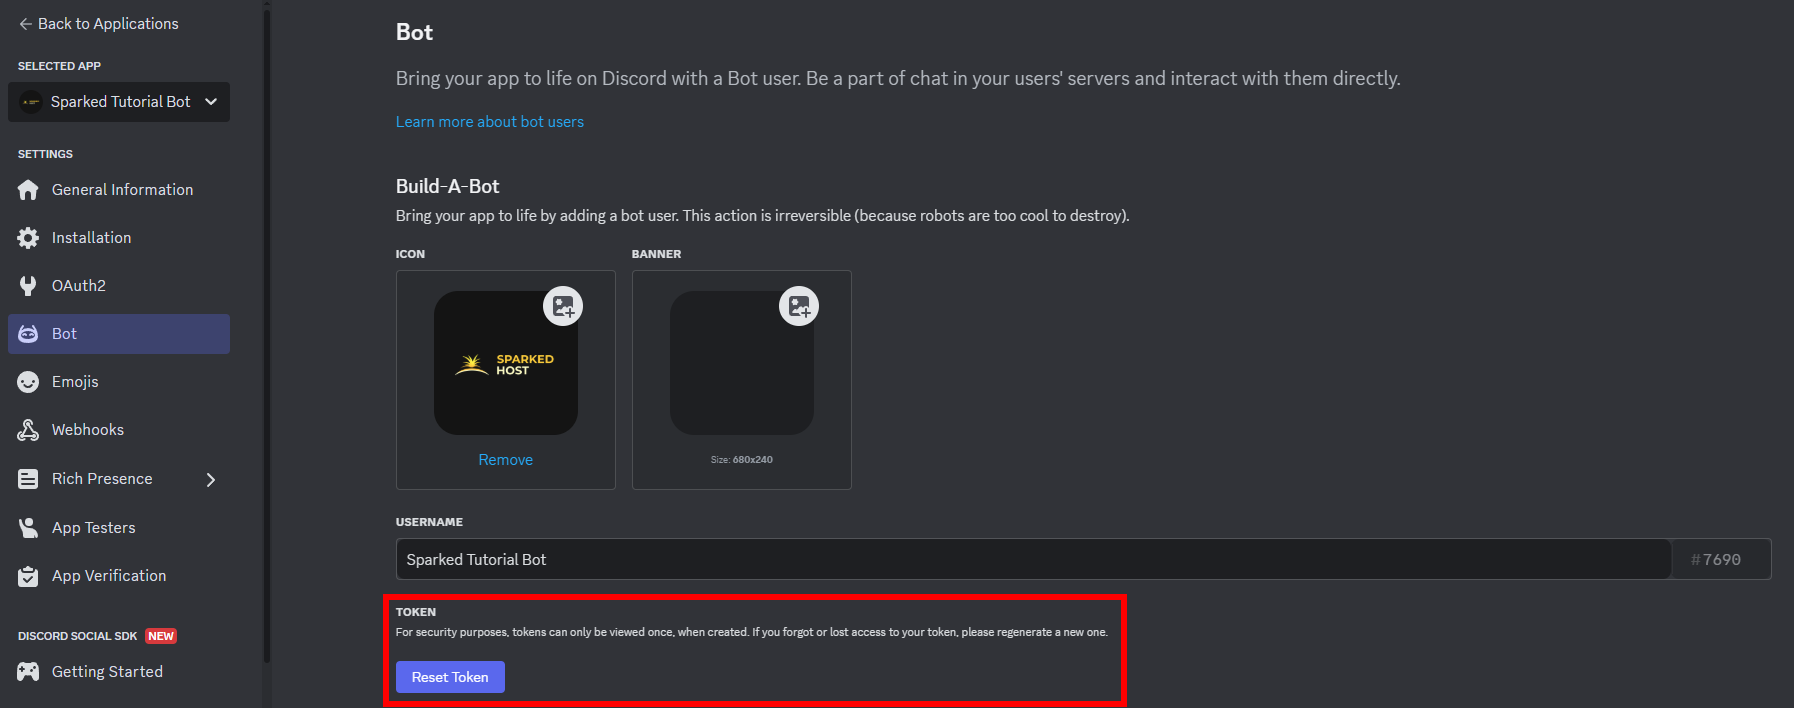
Reset your token with the Reset Token button. Copy it. KEEP THIS TOKEN SAFE!!! Do NOT share it with ANYONE. They can take over your bot and do funny things with it.
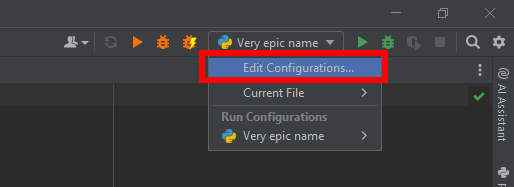
- After that, go to your IDE and set the environment variable
TOKEN(or another name) for the token. In PyCharm, you would do this via (if you're not using PyCharm, see this post https://stackoverflow.com/a/20918496/15982771):
- Go to project configuration in the top right and click
Edit Configurations
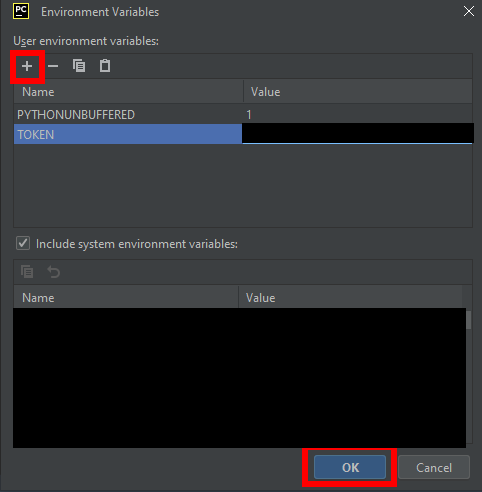
- Open environment variables

- Set the TOKEN variable to your Discord bot token
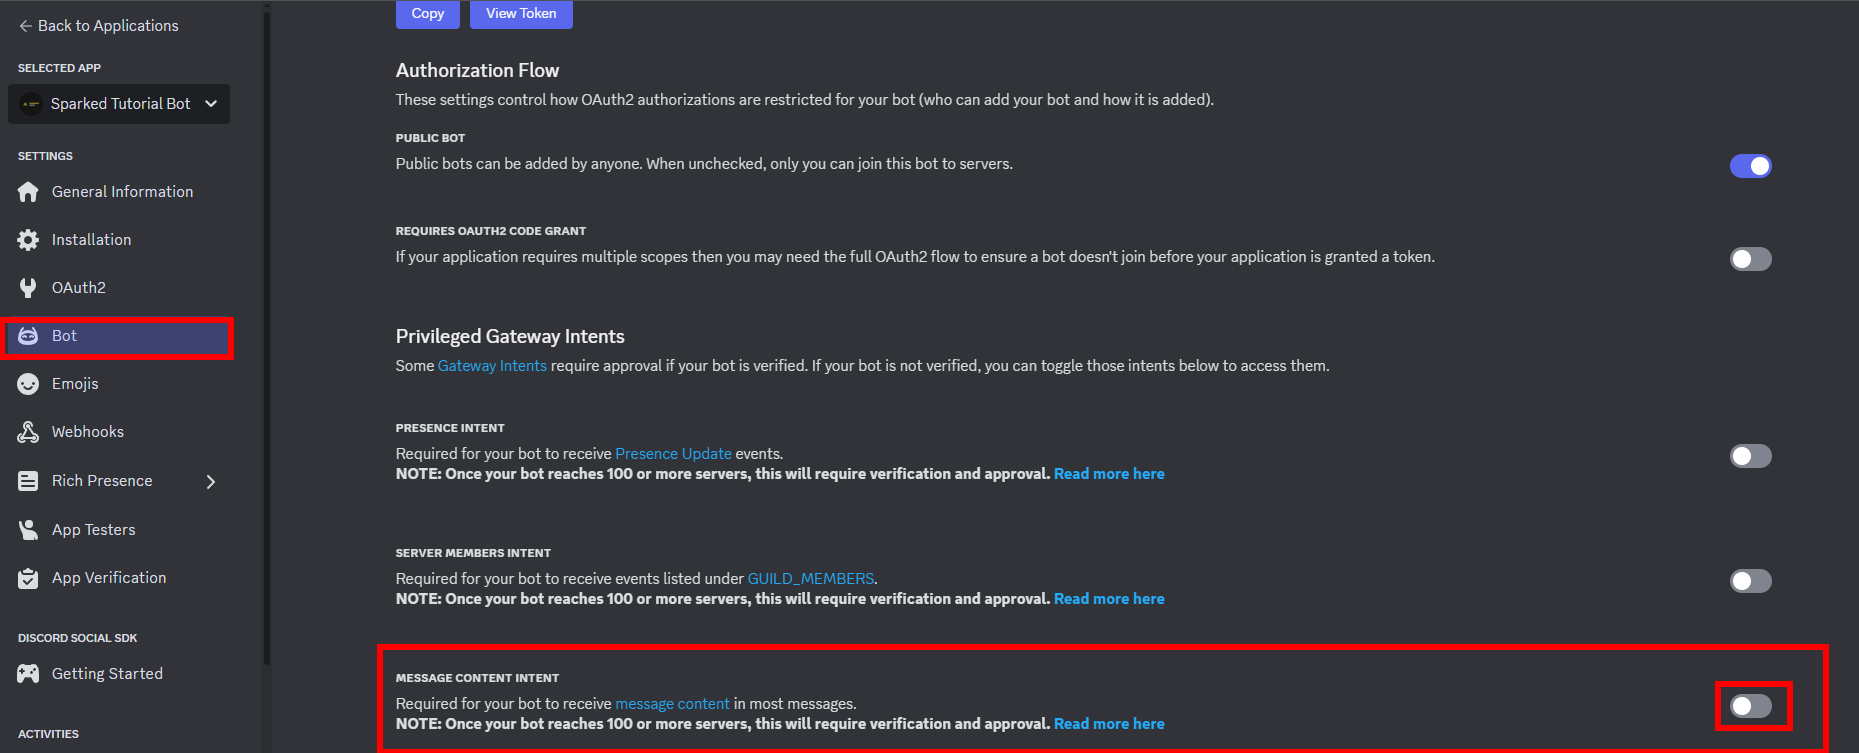
- After that, go back to the
Botpage and selectMessage Content Intentif you're using text-based commands. If you want to know what each intent does, see https://gist.github.com/advaith1/e69bcc1cdd6d0087322734451f15aa2f.
Inviting your Discord Bot
After you get the token set up, you might want to invite your bot. To do that:
- Go back to the developer portal and your Discord application
- Go to the OAuth2 page
- Under
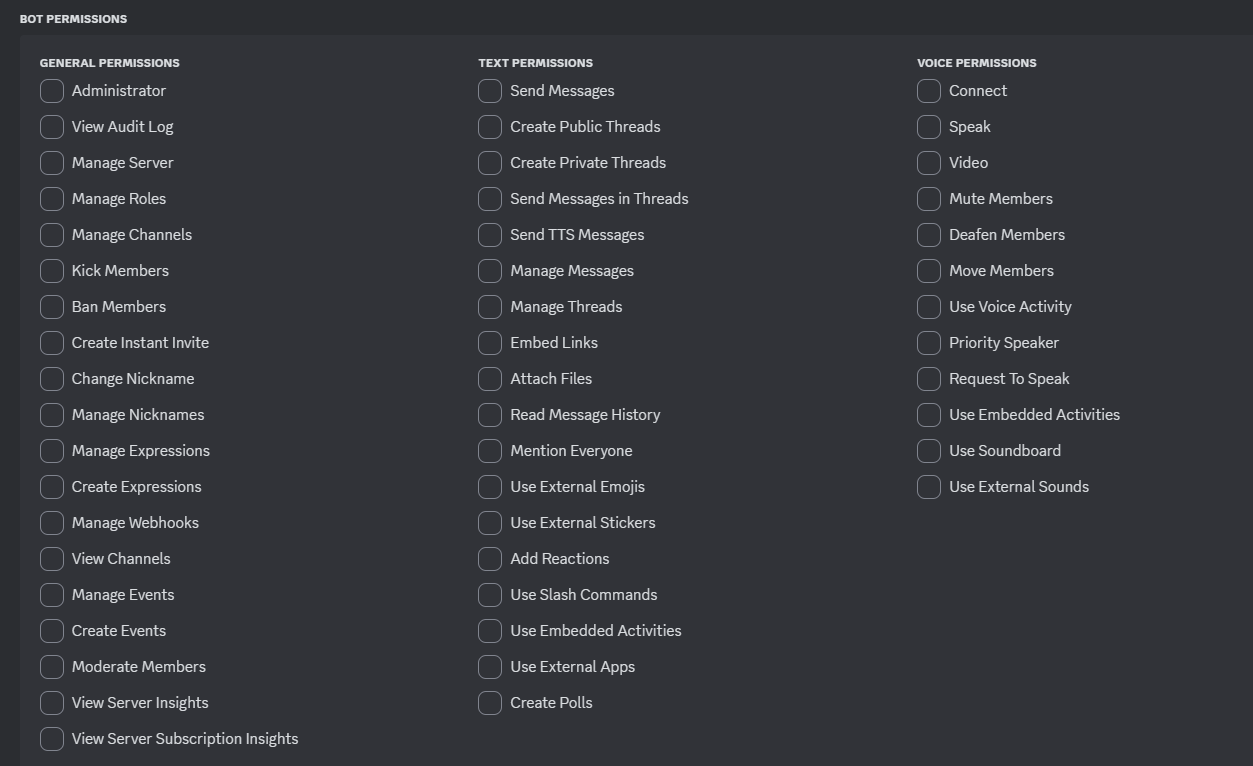
Scopesselectapplication.commandsandbotfor the URL generator
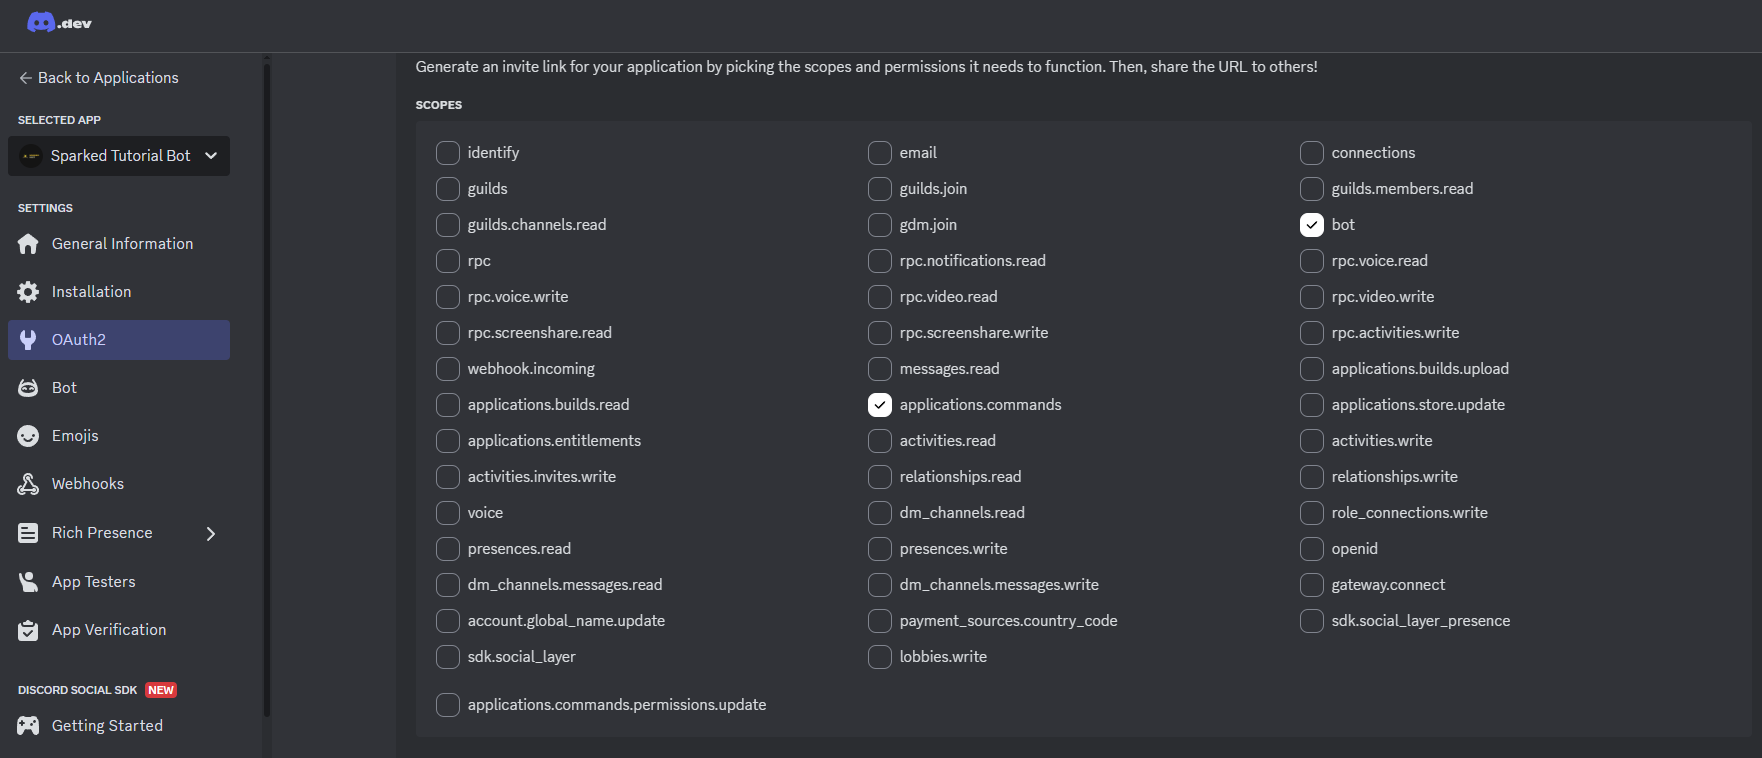
- The URL generator also takes in permissions. For Bot permissions, give it Administrator if you're really lazy, OR just set it to what it needs command-wise. Bot permissions here are the same as user permissions (in the sense that anything set for a user would be the same for the bot):
- Then set the Integration type to
Guild Installand copy the URL generated
- Go to this URL in a new tab to add it to any Discord server you have permissions on
Creating a Discord Server
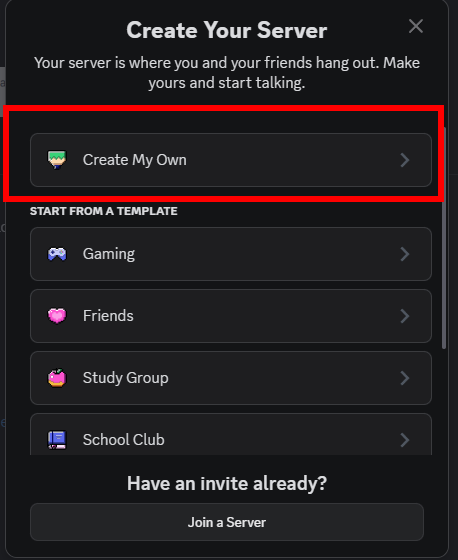
If you don't know how to create a basic, barebones Discord server to test your bot in, this section will cover that.
- Open Discord
- On the left-hand side, you'll see a plus button (you might have to scroll down to the end of your Discord server list).
- Press "Create My Own."
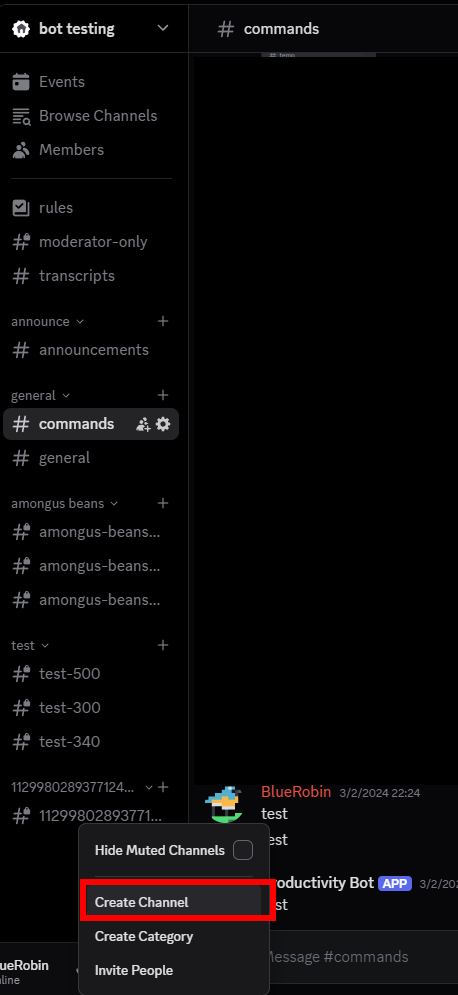
- After you create your Discord server, you'll want to create a Text channel (Discord channel). Right-click on the side and press
Create Channel.
Making a Discord Bot with Discord.py
![]()
Discord.py is a library (a tool that programmers use) that allows interaction with Discord's API. Discord does not have an official Python Discord library. However, using a library will make everything a lot simpler to set up and use, as one doesn't have to interact with a lot of Discord's endpoints on their own with Discord's API.
Discord.py is open source (which means that anyone knowledgeable can contribute to it). It's constantly maintained, and you can find the documentation here. It's also the most popular wrapper to access Discord's API.
Importing the library
With PyCharm:
- Go to
Packagesand search fordiscord.py
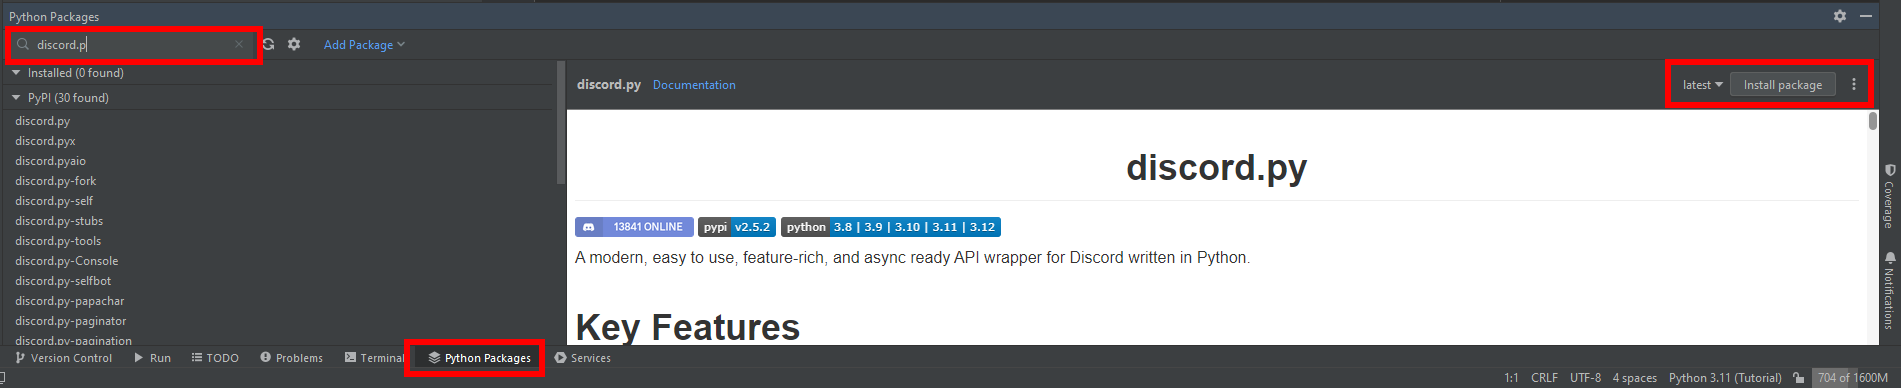
- Press
Install package
If you're using PIP:
Run (in the console)
pip install discord.py
And then import the library in main.py
If pip isn't found, try pip3. If that's not found, you might need to re-install python or add pip to path.
Creating the Bot
First, create a new python file and import the discord bot library at the top with:
import discord
We'll also want to import our Discord token environment variable for later. The os module has a function to do so.
import os
TOKEN = os.getenv('TOKEN')
This is assuming that we saved the environment variable as the string TOKEN.
We'll also want to set intents.
intents = discord.Intents.default()
intents.message_content = True
Intents are used by the Client and are used to disable features that you aren't using. (Set intents.message_content to False if you're just using slash commands)
Next, you'll want to save an instance of Client() to a variable. The Client class will handle and hold Bot commands through decorators. Decorators are an advanced topic in Python, and it can be difficult to grasp when you're starting out.
client = discord.Client()
After importing the client, we can run our bot with:
client.run(TOKEN)
If you want to check when your bot comes online in the console, you could use the on_ready event with the decorator @client.event.
@client.event
async def on_ready():
    print(f'Logged in as {client.user}')
After that, you have your basic Discord bot set up (without any Bot commands yet)!
Your Python code should look something like:
import discord
import os

TOKEN = os.getenv('TOKEN')
intents = discord.Intents.default()
intents.message_content = True

client = discord.Client(intents=intents)

@client.event
async def on_ready():
    print(f'Logged in as {client.user}')

client.run(TOKEN)
If you run your bot now, it should come online.
Basic text commands
This section is if you want to make basic text commands. Skip this part of the tutorial if you do not want to use text commands.
First, we'll want to make sure that the message content intent is enabled in the Discord developer portal.
If it is not enabled in the developer portal or below, new messages won't trigger the event. Message content is a "privileged gateway intent" which means it requires verification after the bot reaches a certain amount of guilds (guilds = servers).
Add the following code:
intents.message_content = True
If you haven't already.
To get messages, we'll use the on_message event with the decorator @client.event.
@client.event
async def on_message(message):
    if message.author == client.user:
        return

    if message.content.startswith('$ping'):
        await message.channel.send(f'Pong! My latency to Discord is {client.latency*1000} ms')
The command name matters here because the decorator uses it to determine what kind of event the function is (an event is something that happens on Discord that can be used to trigger code).
The decorator client.event will register this event so that whenever someone sends a message in a channel that the bot has access to, it'll trigger the command. It's also asynchronous, which means that the Discord client can handle multiple commands at once (read more about it here: https://stackoverflow.com/a/748189/15982771).
The line:
if message.author == client.user:
Makes sure that none of the on_message code gets triggered if the bot sent a new message (this ensures that no infinite loops occur from the bot responding to its own messages, which can get you rate-limited).
message.content is the content of the message in a string. .startswith checks if it begins with the command content.
if message.content.startswith('$ping'):
In:
await message.channel.send(f'[message]')
client.latency is in seconds, which is why it's multiplied by 1000.
When the bot is restarted and the command is run in Discord:
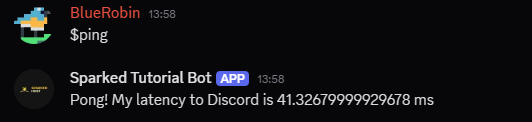
It runs and shows latency!
If you want to add more commands to your Discord client, just add more lines like:
if message.content.startswith('$[command name]'):
        await message.channel.send(f'[message]')
Change the [command name] and [message] to their respective values.
One of the benefits of having a text command system is that it's instantaneous once the bot runs because there's no need to register the command anywhere (unlike slash commands).
Basic slash commands
Slash commands in discord.py are different compared to a lot of other Discord libraries.
The interactions API has a different documentation link: https://discordpy.readthedocs.io/en/stable/interactions/api.html?highlight=app%20commands#
(It's not found in the original API reference.)
First, you import the app_commands module from discord:
from discord import app_commands
Then, you set the variable tree to the CommandTree, which is the container for all Discord application commands (you also pass in the Discord client for the bot):
tree = app_commands.CommandTree(client)
From here, we can now define your slash command.
@tree.command(
    name="Command Name",
    description="Command Description",
    guild=discord.Object(id=guildID)
)
async def epic_command(interaction):
    await interaction.response.send_message("Hello!")
(Documentation here: https://discordpy.readthedocs.io/en/stable/interactions/api.html?highlight=commandtree#discord.app_commands.CommandTree.command)
Replace the [Command Name], [Command Description], and the [guildID] with their respective values.
Also, it's extremely important to reload sync commands in on_ready:
@client.event
async def on_ready():
    await tree.sync(guild=discord.Object(id=912361242985918464))
    print(f'Logged in as {client.user}')
If you do not set the guild parameter, the library will treat it as a global command. This means that it'll take longer to register (sometimes a couple of hours, from my own experience). If it is not a global command, it'll only be a couple of minutes at most.
When you're done, your code should look something like:
import discord
from discord import app_commands
import os
TOKEN = os.getenv('TOKEN')
intents = discord.Intents.default()
intents.message_content = True
client = discord.Client(intents=intents)
tree = app_commands.CommandTree(client)
@client.event
async def on_ready():
await tree.sync(guild=discord.Object(id=912361242985918464))
print(f'Logged in as {client.user}')
@tree.command(
name="ping",
description="Gives bot latency",
guild=discord.Object(912361242985918464)
)
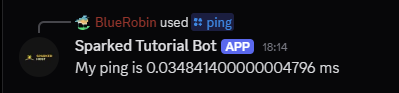
async def ping(interaction):
await interaction.response.send_message(f'My ping is {client.latency} ms')
client.run(TOKEN)
Making a Discord bot with Pycord
![]()
Pycord is a library that gained traction after the main contributor to Discord.py stopped working on the library https://gist.github.com/Rapptz/4a2f62751b9600a31a0d3c78100287f1. It contains a lot of functionality and is constantly being worked on. It's a wrapper to Discord's api. It's also a fork of discord.py, which means that there's a lot of shared functionality.
If you have an error and you go on StackOverflow, it's likely that you'll find a discord.py post before a Pycord one.
Importing the Library
To import the necessary modules with PyCharm:
- Go to
Python Packages
- Search
py-cord(the dash is important!)
- Press
Install package

With Pip:
pip install py-cord
You might need to use pip3 if pip is not found. See: https://stackoverflow.com/questions/23708898/pip-is-not-recognized-as-an-internal-or-external-command
Creating the Bot
Begin by importing the library:
import discord
Then, we'll get the environment variable that we set before and save it into the variable TOKEN. We use the os module to get the environment variable.:
import os
TOKEN = os.getenv('TOKEN')
Next, we'll define the bot:
bot = discord.Bot()
Pycord uses the Bot() class instead of the Client() class.
Yes, there's a Client() class in Pycord, but it functions roughly the same as discord.py without the slash command functionality.
We'll also create the on_ready event via the @bot.listen() decorator. The @bot.listen() decorator is basically the same as @bot.event except it doesn't override the previous set one.
If you're using the on_connect event, you'll need to do this because the default on_connect syncs commands.
@bot.listen()
async def on_ready():
    print('bot is ready!')
The name of the function is important because the decorator uses it for reference to call later when the event runs.
Lastly, at the end of the file, we'll have:
bot.run(TOKEN)
So the bot actually runs.
I'll also note that creating text-based commands is exactly the same process for discord.py (so I won't go over it).
Creating Slash Commands
Creating slash commands in Pycord is extremely easy (compared to other libraries):
@bot.slash_command(name='hi', guild_ids=[GuildID])
async def hello(ctx):
    await ctx.respond(f'!(I have been summoned)! Hello world! My latency is: {bot.latency * 1000} ms')
The decorator @bot.slash_command is used to create slash commands. Within this decorator, guild_ids is used for setting the Discord guild ID of the command. If it is not set, the command is treated as a global command to Discord's API and takes a longer time to register (because it is registering everywhere).
This function must also be asynchronous to properly interact with Discord's API.

Using GitHub
Why use GitHub?
This is arguably one of the most important skills for any programmer to learn. Saving your work. If you don't save your work constantly (which has happened to one of my friends), then if something goes wrong, your work could get destroyed. Hence why source control is extremely important!
Another benefit of using source control is that others can contribute if you want to work with someone else. GitHub knowledge is also required for a lot of jobs.
In this section, I'll go over the basics of saving your work on GitHub so that you won't have to worry about all your work going to waste.
The Basics
You can get git here: https://git-scm.com/downloads
(There are other ways, but this is the easiest)
You'll also want to set up SSH keys for your account if you haven't already: https://docs.github.com/en/authentication/connecting-to-github-with-ssh/generating-a-new-ssh-key-and-adding-it-to-the-ssh-agent
(The tutorial on GitHub explains it better than I ever could.)
Creating your repo
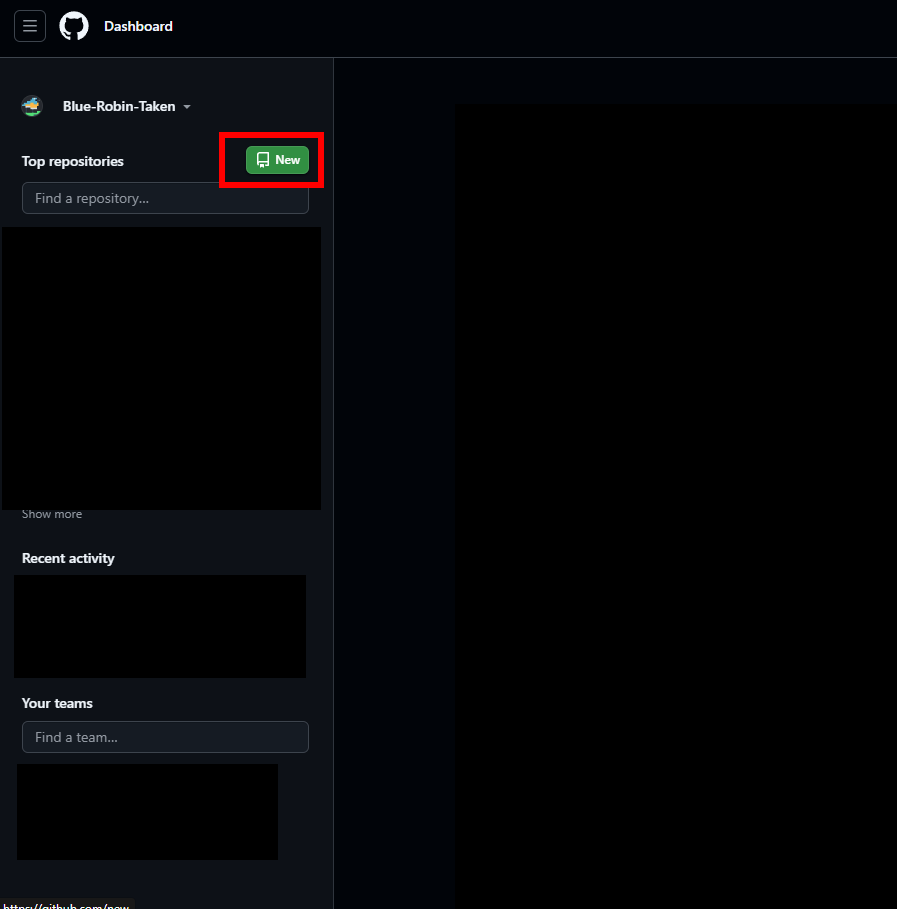
Go to https://github.com/ and log in.
Create a new repository on the GitHub dashboard with the New button.
Next, go back to your folder that you want to upload to your repository and do:
git initGit Ignore file
The Git ignore file is .gitignore, and any paths in there will be ignored by git add . (they won't be added to any external repositories). This file is extremely important to make sure that important sensitive files (like tokens) aren't leaked online.
See more about GitHub ignore files here: https://www.atlassian.com/git/tutorials/saving-changes/gitignore
Basic commands
First, you'll want to add all the files with:
git add .
Then you commit files (committing a file is like saving it):
git commit -m "commit message"
And then you upload it to git with:
git pushHOWEVER, it's likely that the git repository hasn't been set yet! So,
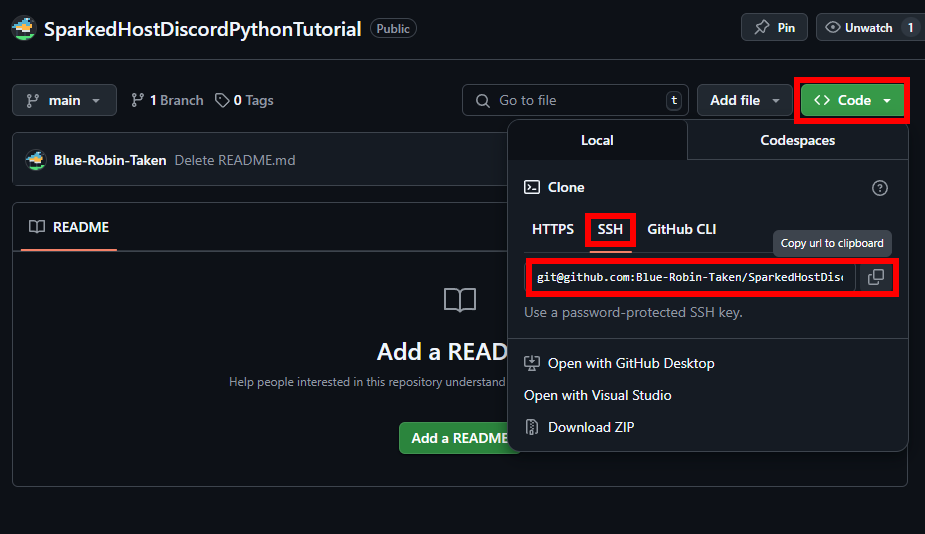
git remote add origin git@github.com:Blue-Robin-Taken/SparkedHostDiscordPythonTutorial.git
Replace [git@github.com](mailto:git@github.com):Blue-Robin-Taken/SparkedHostDiscordPythonTutorial.git with your repository's SSH link:
Then run:
git push --set-upstream origin main
You do not need --set-upstream origin main if the upstream has already been set.
By: Julian T.
Updated on: 08/05/2025
Thank you!