How To Create A Valheim Custom World
Creating a custom world in Valheim lets you tailor the Viking experience to your liking—perfect for solo adventurers or friends seeking a unique map layout. Whether you want easy access to bosses or a scenic base location, Valheim’s world generation options give you control over the terrain and biome distribution.
In this guide, we'll cover how to create a Valheim custom world so that you can use the desired world seed on your Valheim dedicated server. You can choose from a lot of unique Valheim seeds, such as ones with a small starting island that transitions into a large Plains biome, which is ideal for advanced players. This can give a better experience in playing on your Valheim server, and have much more fun.
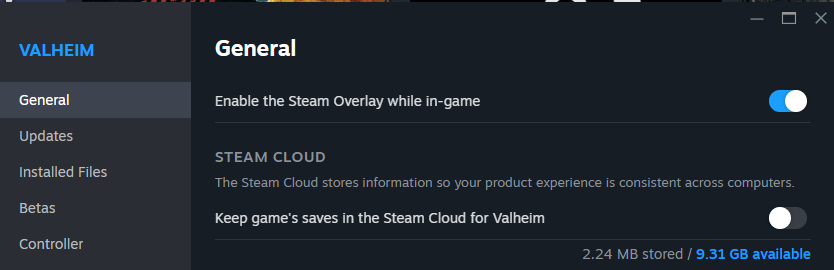
Step 1: Disable Cloud Saves
- Open Steam
- Navigate to Valheim
- Right-click and click Properties
- In the general tab, disable Steam Cloud
Step 2: Generate A Custom Seed
- Start the Valheim game on your PC.
- Click on Start Game
- Select your character in-game and click Start
- On the start window, click New
- Enter the world name you wish to use and the custom-specific seed you want to play on, as shown in the example below. This seed spawns the player next to a black forest
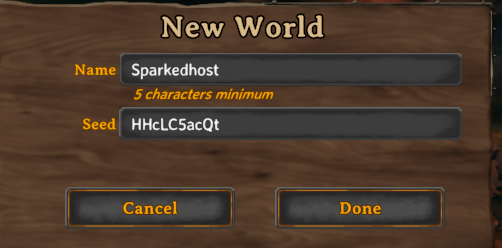
- Click Done, select the world afterwards, and click Start.
- On your keyboard, use
Windows + R, and head over toC:\Users\pc\AppData\LocalLow\IronGate\Valheim\worlds_local
- You'll be using both the .db & .fwl files of your world you just created
- Open FileZilla and connect to your service.
- Open your Apollo panel
- Head over to the Files Manager
- Proceed to the
/home/container/.config/unity3d/IronGate/Valheim/worlds_localfolder and upload both .db & .fwl world files there.

- Proceed to the startup section of your control panel now, and under the World Name Variable, enter your world name you just uploaded (Example: if the file names are "Dedicated.db & Dedicated.fwl" the world name will be "Dedicated", enter this into the variable input box).
Still have some questions about creating a Valheim custom world?
Don't hesitate to contact our support team! We're available 24/7 to assist!
By: Ali A.
Updated on: 15/07/2025
Thank you!