How to Make a GMod Server
Hosting a GMod server can seem difficult at first, but it's quite easy to accomplish (depending on the method that you choose).
Different methods of hosting a server have different costs, difficulties, and different speeds.
Below are two methods and how to use them.
Method #1: Using Sparked Host for Your Garry's Mod Server
Sparked Host is one of the best options for hosting your GMod server. In a few clicks, it can allow you to have an easy, fast, effective, cheap, server.
Sparked Host Benefits
- Quick and easy support
- Cost-effective servers
- Extremely easy to set up and access
- Many different options at different price points
- Very secure firewall with DDOS protection
- Preset code/scripts to make creating the server very fast
To host with Sparked Host
There are three simple steps:
- Go to the Sparked Host website.
- Click on a server and then purchase it depending on what you need.
- See your server panel at the page: https://control.sparkedhost.us/ and run the server (on first launch it might take a bit to install all relevant files).
Configuring your Sparked Host server
Server configuration can be found in the Files menu on the righthand side of the panel menu: (go to https://control.sparkedhost.us/ and navigate to your server if you don't have your server open):
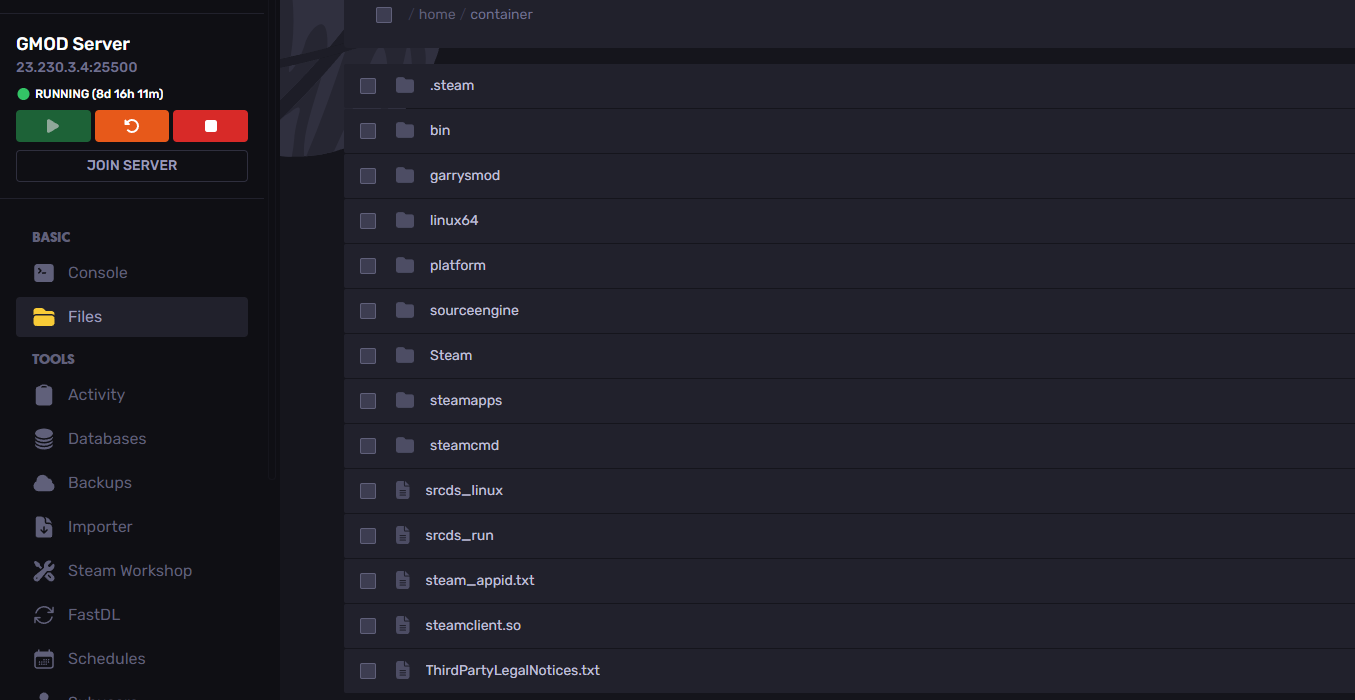
Afterward, go to garrysmod/cfg/server.cfg
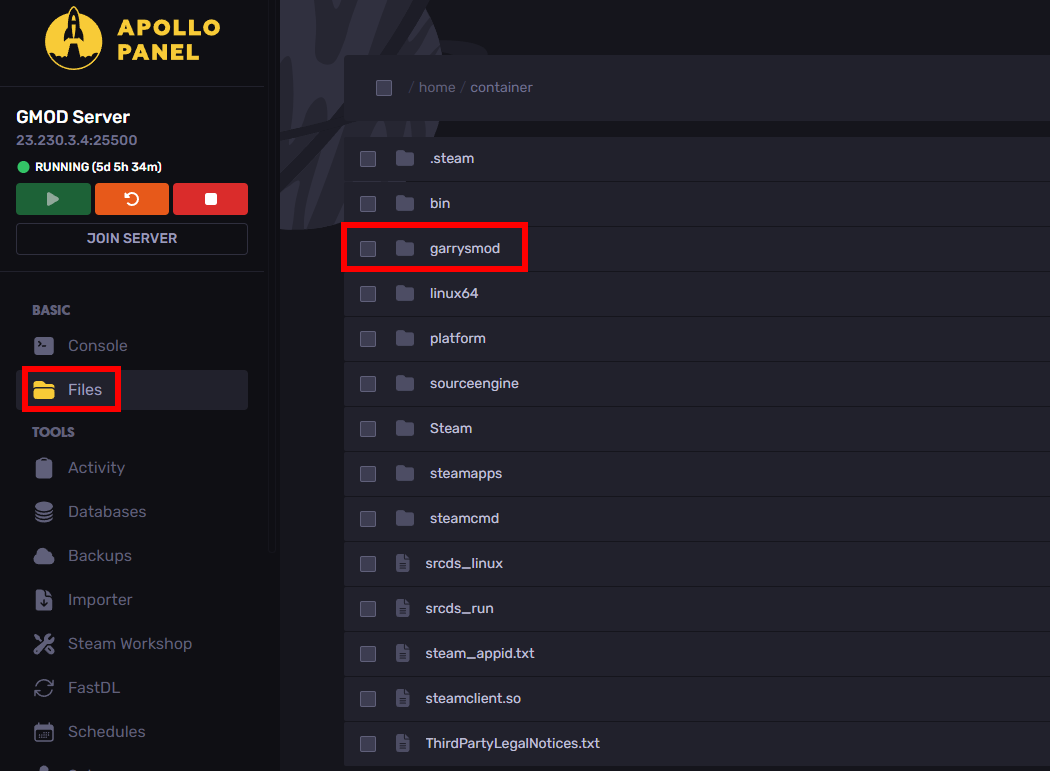
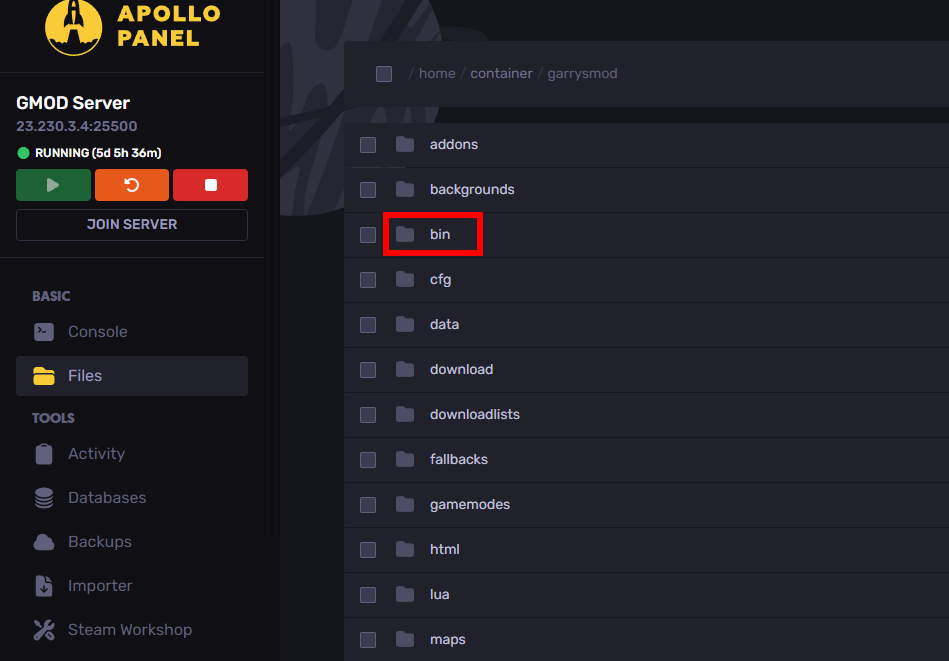
Edit server.cfg and then click save (restart your server for these changes to take place). Below are some parameters that you can set with server.cfg that might be useful:
sv_passwordis the server's join password. When you create a password, make sure it's secure enough so that people can't brute force it (at least 8 chars with special characters)
sv_locationis the server's flag. View the full list of potential flag parameters here: https://en.wikipedia.org/wiki/ISO_3166-1_alpha-2 (set the flag to an ISO code for it to work)
Method 2: Using a VPS/Dedicated Server for Your Game Server
Speed for your garry's mod server entirely depends on what you're buying. If you're buying an expensive server, it'll be faster. It also depends on the amount of people on the server and the location relative to your server's player base.
Server hosts are extremely easy to use and no prior knowledge required / very little knowledge is required.
Server hosts can range from being quite cheap (a couple of dollars a month) to being quite expensive (100$+ a year). The cost mainly depends on the resources that the server host provides. More CPU power and RAM mean that the server host will cost more. Yet, it also means that the server will be able to host more players more effectively.
You don't have to give your IP away (instead, you give the server's IP). It'll most likely be quite secure with a strong firewall and DDOS protection. Because you're not using your local network to share the server, your information will be safer.
If you have a problem with the server or a bug to fix, the server host's support team might be able to help you versus just hosting alone. However, the quality of support entirely depends on the service you are buying.
It can be more difficult to use (you might have to learn Linux, ssh, etc.). It can also be more expensive depending on the resources provided for your garry's mod server.
Hosting resources will be shared between other hosts. It will be cheaper than a dedicated server host, but will be less powerful.
Prerequisites to Start
Terminology
- VPS (Virtual Private Server): A server on a computer. That computer also has other servers. Even though the resources are shared, it'll look like your server is running on its machine.
- SSH (Secure Shell): Allows you to remotely connect to another computer (like a VPS)
- convar: a variable that can be changed in the console.
Most virtual private servers run on Linux. You'll need to learn basic Linux if your server is a VPS (virtual private server)
Running on a Dedicated Server or a VPS will require you to know how to use it.
Server hosts like SparkedHost require no prior knowledge.
Self-Hosting
Self-hosting a gmod server can be difficult. You will have to do a lot of configuration and go through the command line.
Self-hosting is cheap because your Garry's mod server can run on any machine.
If you're self-hosting, you'll have to be careful of your configuration (firewalls, etc.). If you open your server to the internet then hackers might try to break in.
Steps to self-hosting & installing server files for a Garry's mod dedicated server (for Windows):
This tutorial is only for Windows; if you need to set up a server for a Linux server, scroll down.
( https://www.youtube.com/watch?v=DD3YTMoemzU is a very helpful resource)
- Download the Steam CMD (Scroll down until it shows the below screenshot)
Click the link highlighted below.

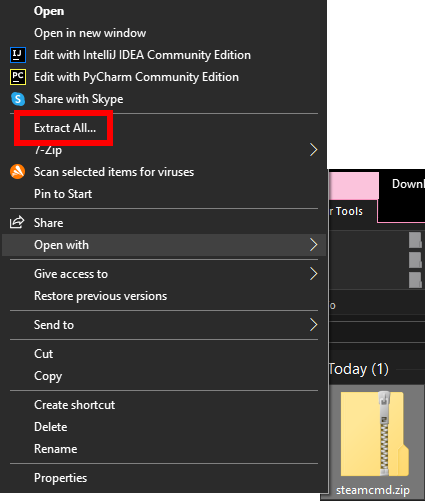
- Extract the ZIP file. Do this by right-clicking on the zip file and pressing "Extract All":
- Run steamcmd.exe (double-click it) from the extracted folder (open the folder by also double-clicking it). You might need administrator permissions to complete this task.
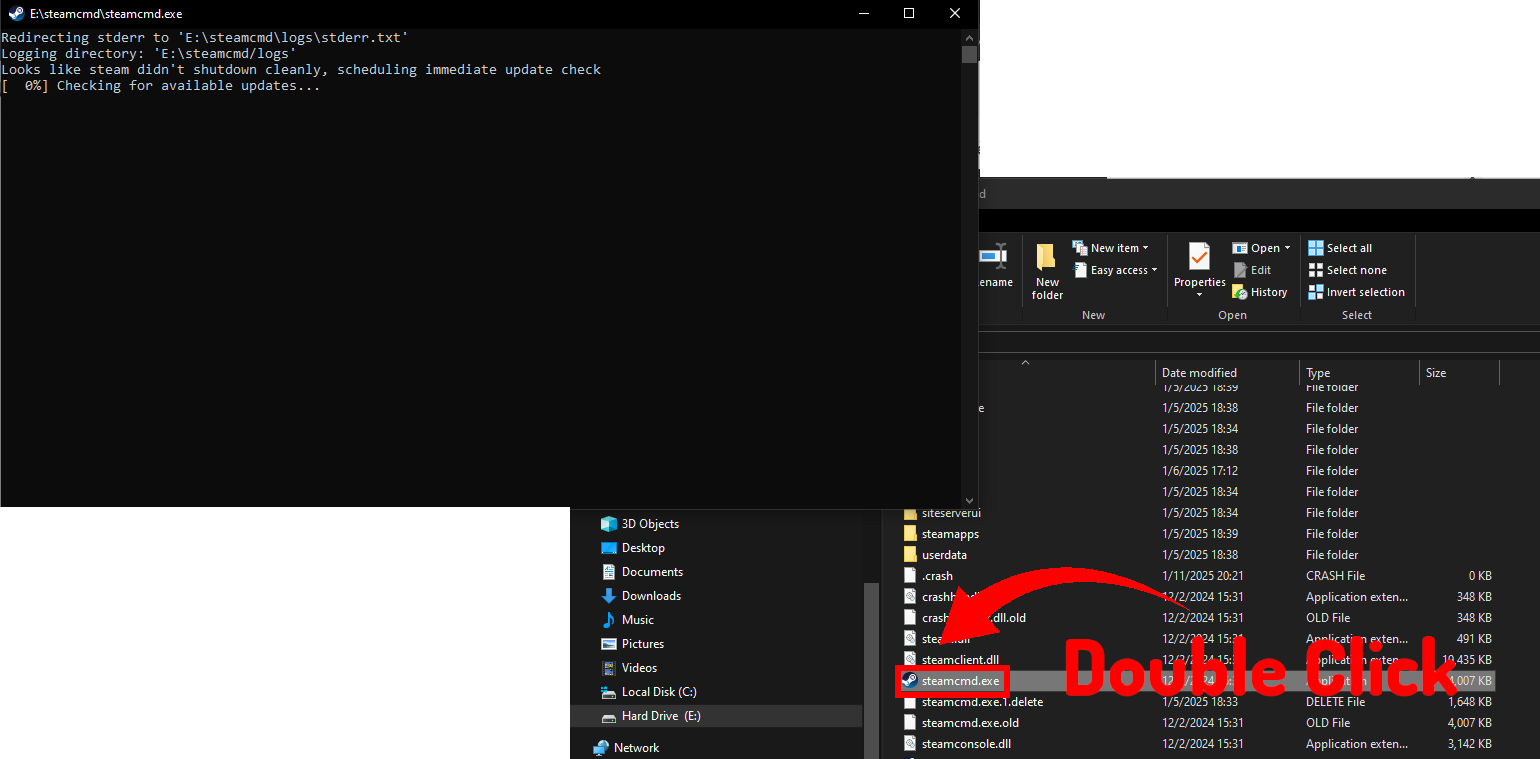
- Run
app_update 4020 validate(type it or copy-paste and press enter) in the provided console's command line which installs the server files.
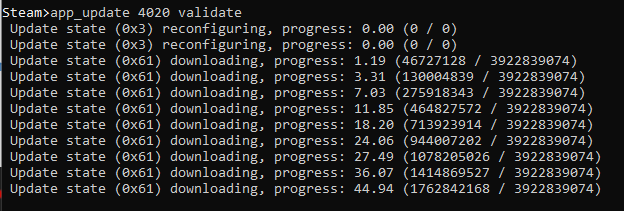
If you don't want to download the server files in the same folder, you can select a different path:
force_install_dir FOLDERPATH
Replace FOLDERPATH with the path you want to install the server in.
If it says "ERROR! Failed to request AppInfo update, not online or not logged in to Steam." after attempting the above command,

Then you can log in as anonymous with the "login anonymous" command & rerun the command from before:

- Exit the terminal after it's finished installing and the command completes
- Go to the folder and follow these navigation instructions:
- Open the steamapps folder
- Open the common folder
- Open the GarrysModDS folder
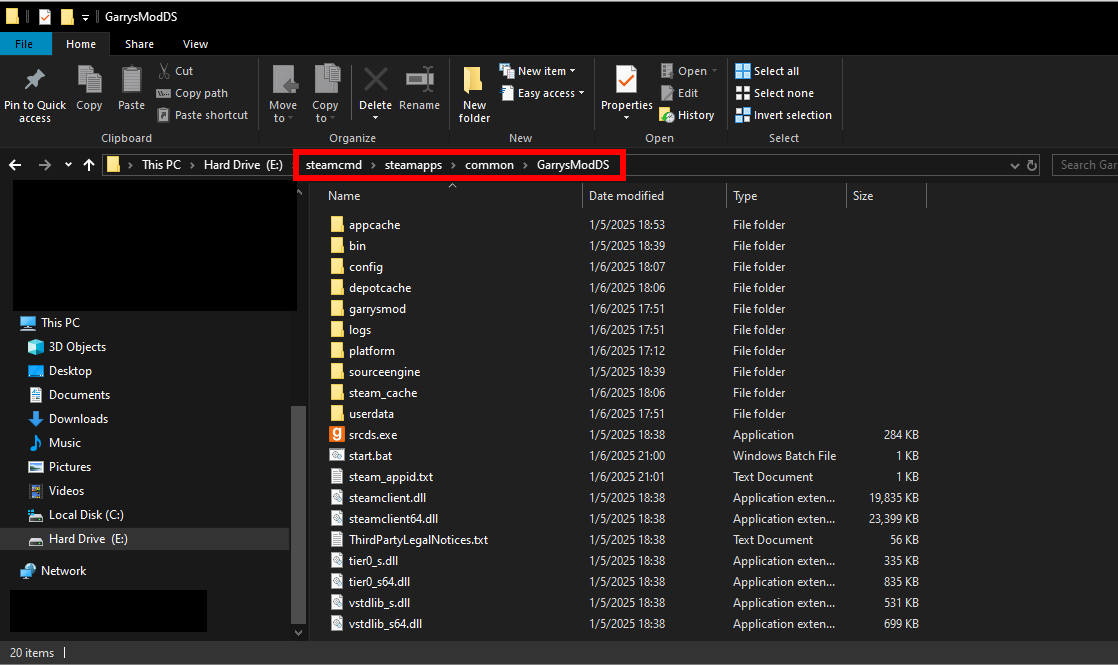
- You will need to run some commands in the command prompt to start your server. However, these can be automated by a script that we'll create in a
.batfile..batfiles automatically run Windows commands in order.
Here's how to create that file:
- Enable file name extensions. Press "view" in File Explorer and tick the "File name extensions" box.
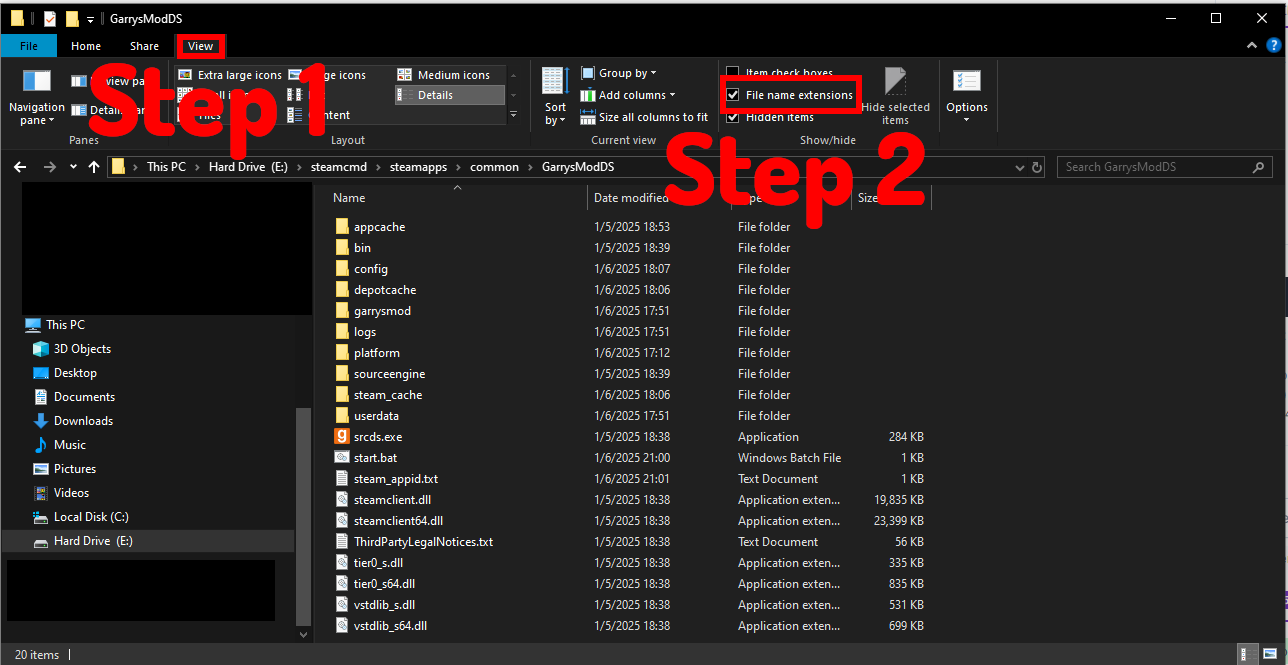
- Create a new file by:
- Right Click
- Hover over "New"
- Click "Text Document"
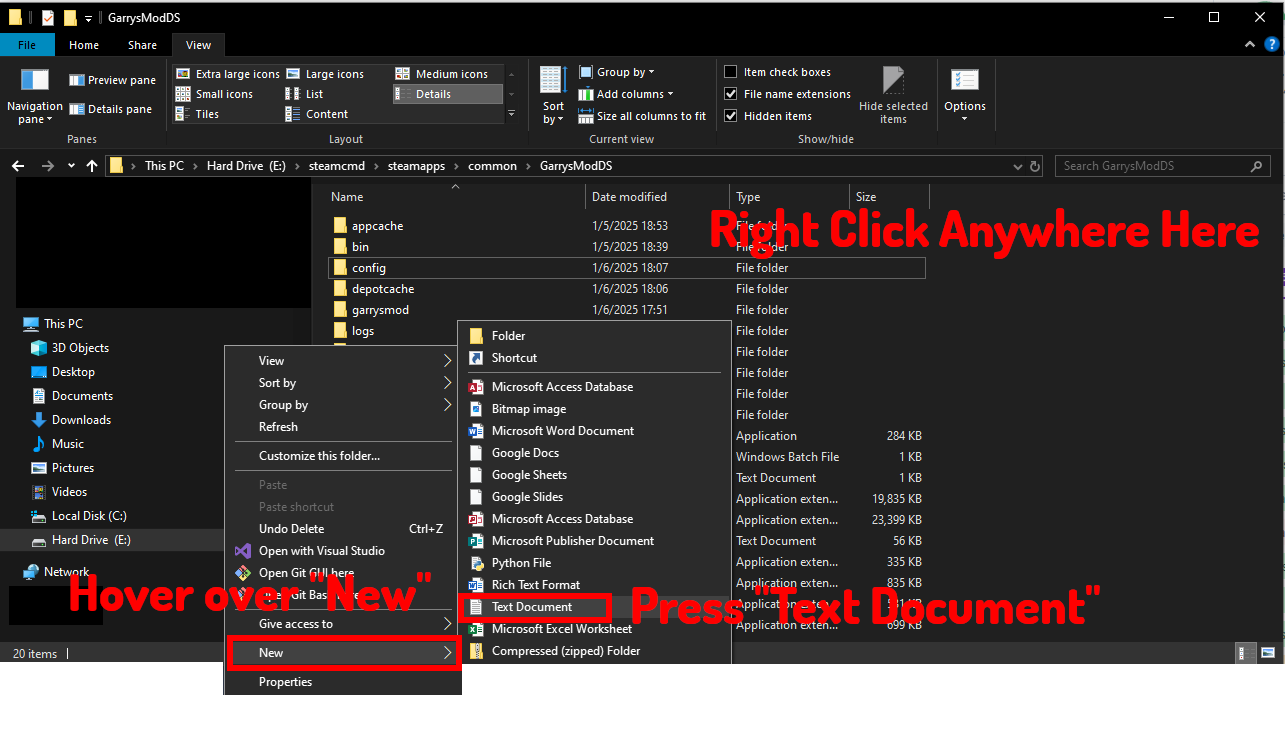
Then, rename the file to "start.bat" by:
- Right-clicking on the file
- Pressing "Rename"
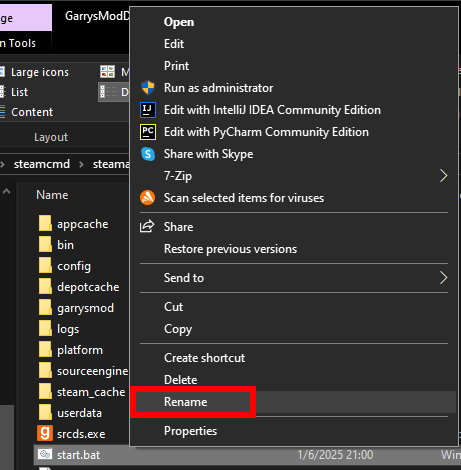
- Typing start.bat
Edit the file by right-clicking the file and pressing "edit":
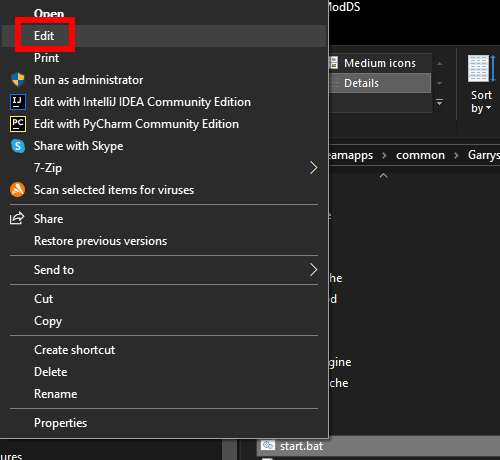
Add the following text (copy paste, CTR+V and CTR+C) and save (CTR+S): (This also contains some cfg (config) stuff with parameters that you can change later)
@echo off

        cls
        echo Protecting srcds from crashes...
        echo If you want to close srcds and this script, close the srcds window and type Y depending on your language followed by Enter.
        title srcds.com Watchdog
        :srcds
        echo (%time%) srcds started.
        start /wait srcds.exe +host_workshop_collection +r_hunkalloclightmaps 0 -console -game garrysmod +gamemode sandbox +map gm_flatgrass +maxplayers 32
        echo (%time%) WARNING: srcds closed or crashed, restarting.
        goto srcds
In the above script (you can see more about that here https://steamcommunity.com/sharedfiles/filedetails/?id=1878370116), there are parameters like +maxplayers and +map which change the map and the max amount of players.
You can find the full console parameters for srcds.exe here (if you want to make your own startup.bat configuration):
https://developer.valvesoftware.com/wiki/Command_line_options

- Double-click on start.bat and your server should be launched (It will say "VAC secure mode is activated" when complete)!
Note: If you want to find your IP, do ipconfig in the command prompt to find your IP address
How to Self-Host a dedicated Garry's mod server OR setup a VPS (for linux):
- If you're using a VPS then SSH (connecting to the server remotely) into the server. If you're running this locally (if it's self-hosting, then you don't need to worry about SSH).
In the terminal connect to your server via SSH with:
ssh [username]@[hostname or IP address]
You should be able to find this in your server's panel. Make sure the user that you're logging into with SSH has admin permissions (which might be needed to install some dependencies).
- Install SteamCMD for linux. You can find the outlined commands here.
IMPORTANT NOTE, DO NOT RUN STEAMCMD AS ROOT (security risk outlined in the documentation), generally not running as root is good practice
- First, create a steam user:
sudo useradd -m steam sudo passwd steam
In the two lines above, the user is named steam and the password is set to steam. You should set the password to something much more secure. At least 8 chars with special characters should suffice.
- Go to the home directory for the user
steamthat we created before:
sudo -u steam -s

        cd /home/steam
- Download relevant libraries important to creating the server:
You can see the full list of different ways to install the dependencies below which were gathered from the documentation here
- For Ubuntu:
sudo add-apt-repository multiverse; sudo dpkg --add-architecture i386; sudo apt update sudo apt install steamcmd
- For Debian:
sudo apt update; sudo apt install software-properties-common; sudo apt-add-repository non-free; sudo dpkg --add-architecture i386; sudo apt update sudo apt install steamcmd
- For Arch:
git clone [https://aur.archlinux.org/steamcmd.git](https://aur.archlinux.org/steamcmd.git) cd steamcmd makepkg -si
- For docker:
docker run -it --name=steamcmd cm2network/steamcmd bash
- Run SteamCMD (be in the same directory):
steamcmd- Download gmod server files:
- Login as anonymous:
login anonymous- Download gmod server files:
app_update 4020
- Once finished, type
quitand press enter.
- Open the port to the firewall (if your VPS or local system is debian/ubuntu/a distro that has a ufw, if not use the server's panel):
In the linux console, use the ufw (uncomplicated firewall) to allow certain ports:
sudo apt install ufw -y
(Run the above if not installed)
Run the following lines to allow some ports after ufw installation:
sudo ufw allow 22/tcp  sudo ufw allow 27005:27015/udp

    sudo ufw allow 27005:27015/tcp
Enable the firewall with the following line:
sudo enable ufw
- Run your server after installation and opening ports with the firewall.
Some tutorials recommend usingscreen(a mistake on their part) to run your server after disconnecting from ssh (if you're using a VPS), however, there's a far superior method.
- Install tmux by following the commands for each distro here (disregard this step if you're not using SSH):
https://github.com/tmux/tmux/wiki/Installing
- Enter tmux:
Type the line:
tmux- Run your server:
./srcds_run -game garrysmod +maxplayers 12 +map gm_flatgrass
You can re-enter tmux by doing
See more tmux functionality here: https://askubuntu.com/a/220880/1678080
How to Configure your Garry's Mod server (windows and linux)
In this section of the tutorial, you can learn how to set up some server components that you need. See https://wiki.facepunch.com/gmod/Downloading_a_Dedicated_Server for more information.
How to add a GSLT ( Game Server Login Token)
This is extremely important if you want your server to be ranked well in the server browser. If you do not do this, you will be heavily penalized. See more information here.
- Go to https://steamcommunity.com/dev/managegameservers to create your token
- Set the AppID as 4000 for Garry's mod
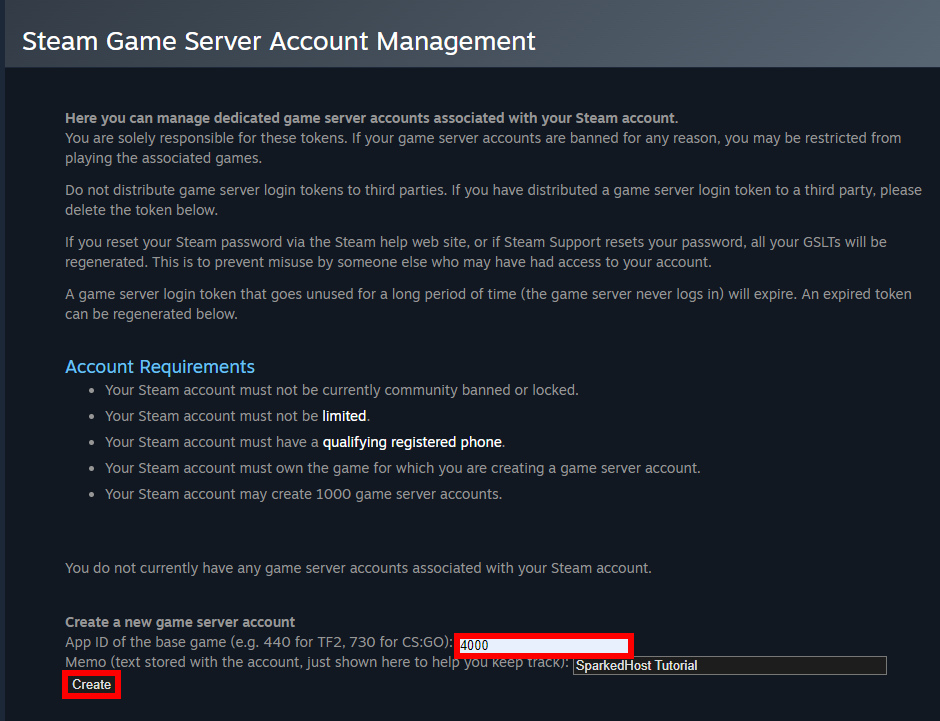
- Copy the Login Token (DO NOT SHARE IT WITH ANYONE)

- Add your login token:
+sv_setsteamaccount YOURLOGINTOKENHERE
Replace YOURLOGINTOKENHERE with your token copied in the last step.
Add that line to the end of your startup line when running srcds.exe (for windows) or srcds_run for Linux.
- Restart your server instance
How to Install Addons
Addons are useful if you want to install maps or other things.
If you want to install it manually, you could do:
- Go to https://gamebanana.com/games/73 or another website where you can download the addon (be careful of viruses)
- Extract via 7zip (free) or winrar (winrar is kinda bad though).
- Add it to the addons folder in your server (located in
garrysmod/addons)
- Restart the server
You could also install it from a workshop collection:
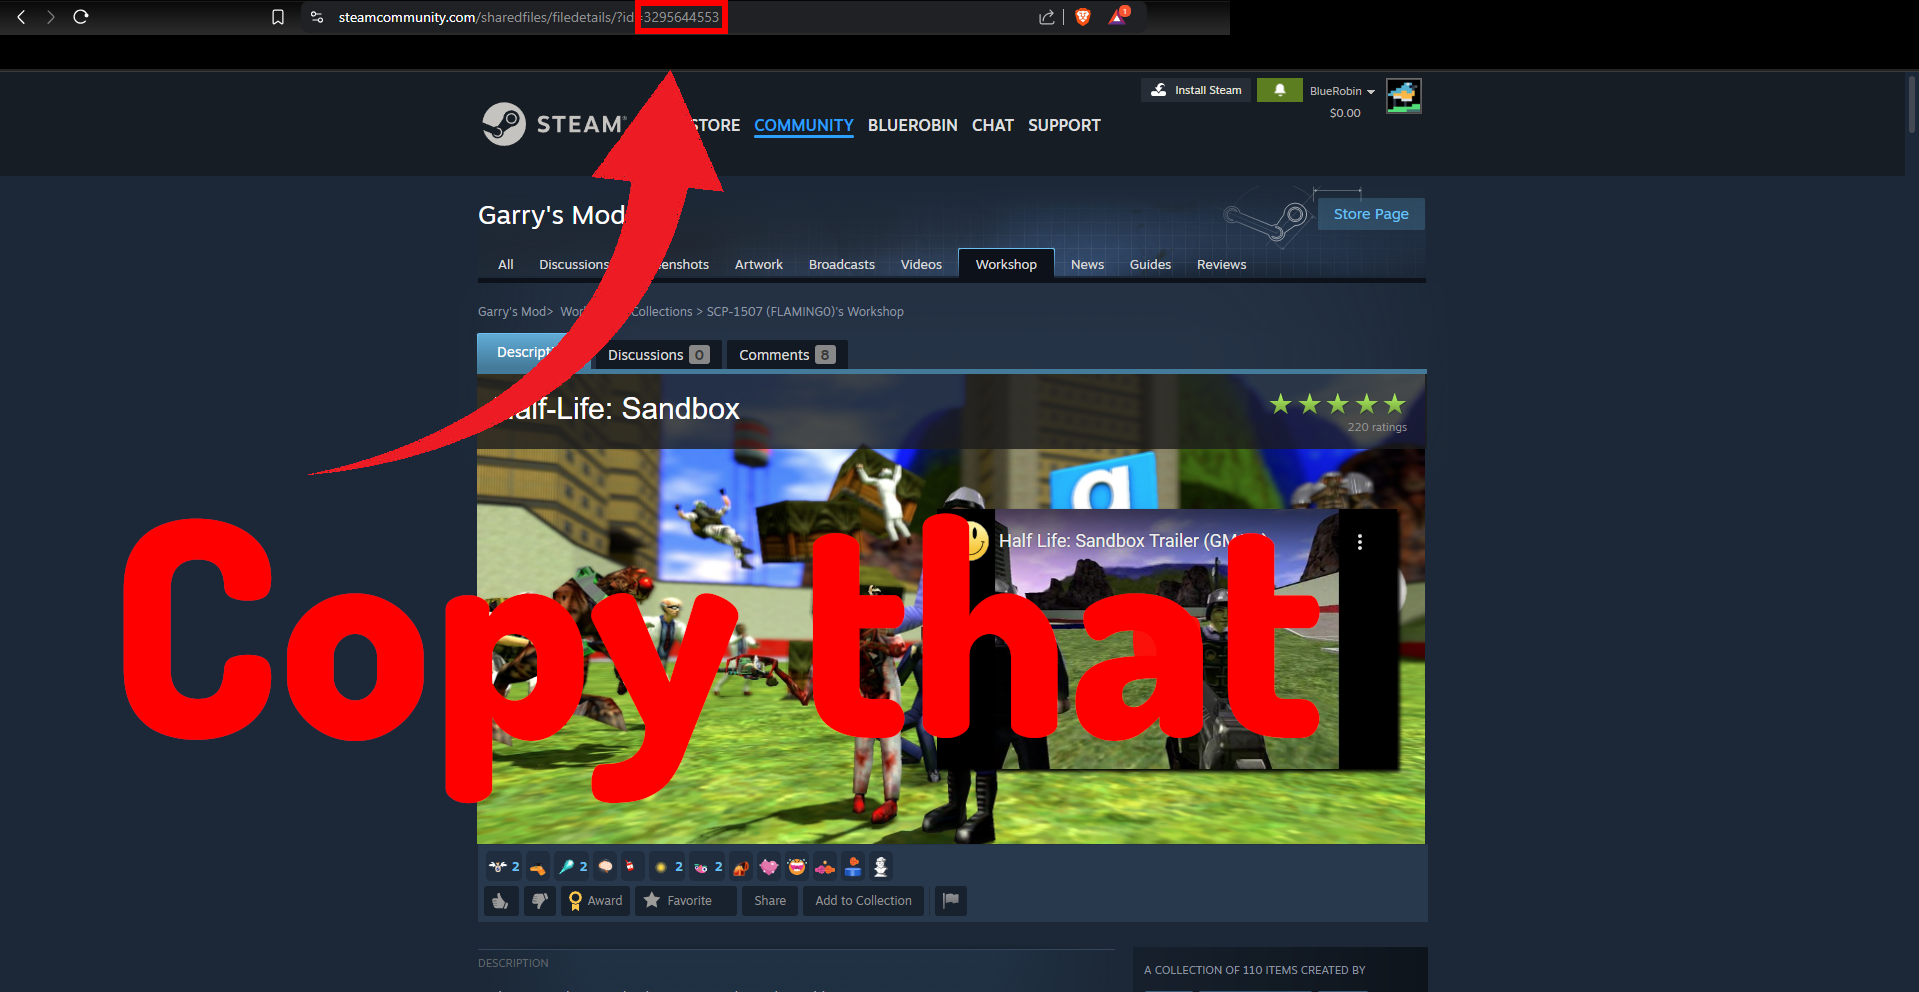
- Find a steam workshop collection at https://steamcommunity.com/workshop/browse/?appid=4000§ion=collections (or make one)
- Get the collection's ID from the URL
- Set the parameter
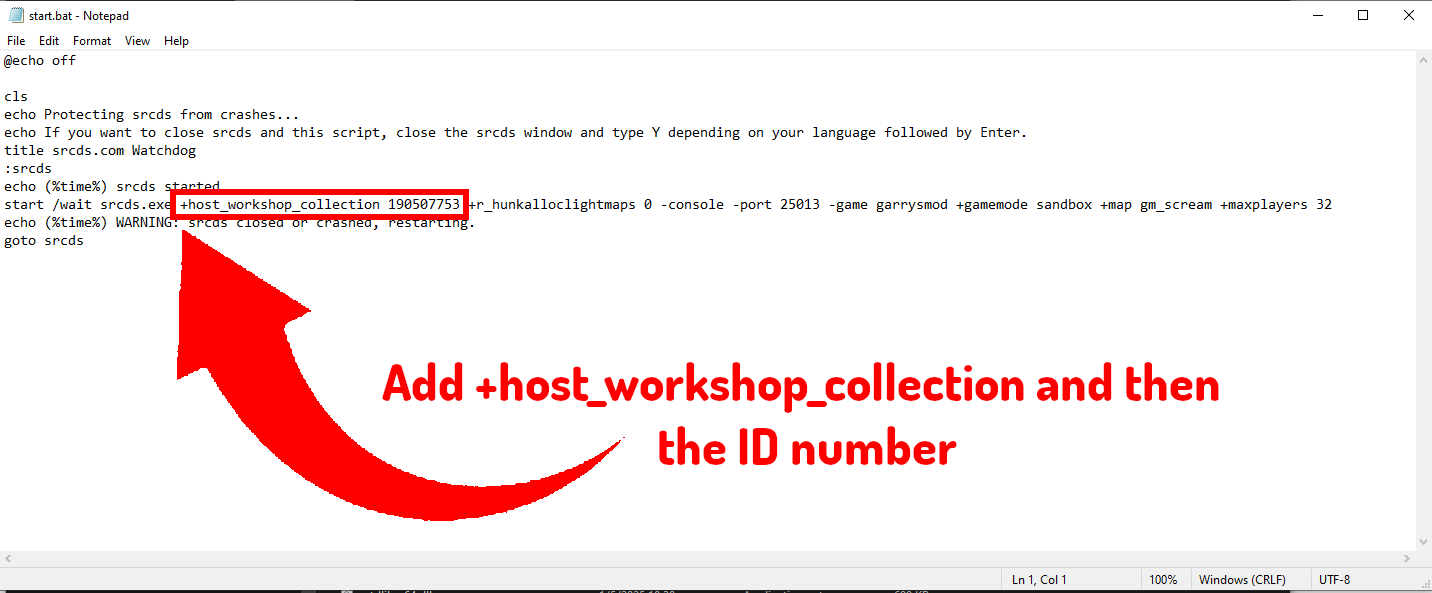
+host_workshop_collectionto the ID instart.batconfiguration (for windows) or when you runsrcds_run(for linux)
- Restart the server (it might take a while for all the addons in the collection to download)
After the map has been downloaded, you can change the +map parameter to the downloaded map.
changing the gamemode
gamemode is a convar that you can set in the console. The gamemode can also be changed in the startup script with +gamemode.
How to hide your server from the server browser in the menu
To hide your server, just put hide_server 1 in the console and press enter.
To unhide your server, just put hide_server 0 in the console and press enter.
Server operator rules
Following these rules will help your server to not get blacklisted:
- Follow Facepunch's general guidelines: https://facepunch.com/legal/servers
- No sexual violence
- No nazism
- Don't fake server information
- No malicious actions towards the player
Steps to playing/joining a Garry's mod self hosted server locally
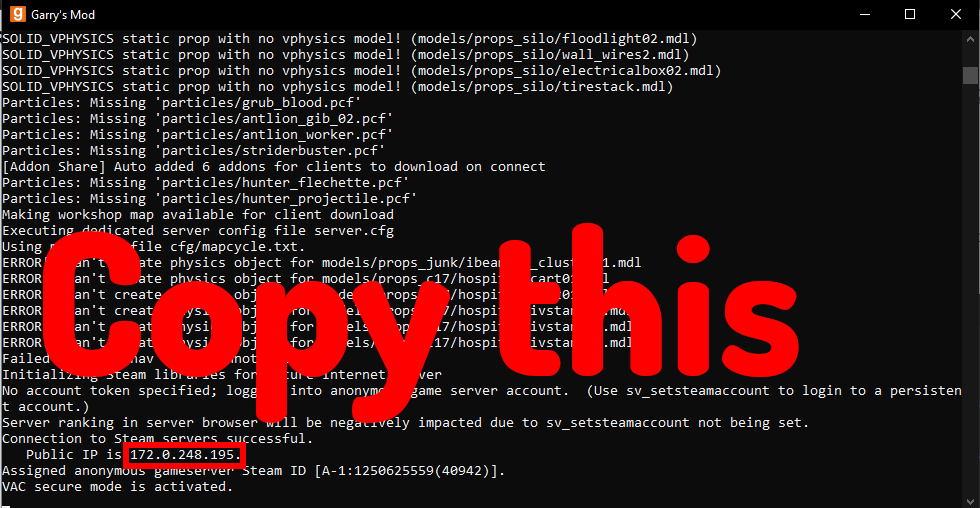
- Once your server has started from start.bat, you will see the IP for your gmod server echoed in the console:
- Open Garry's mod.
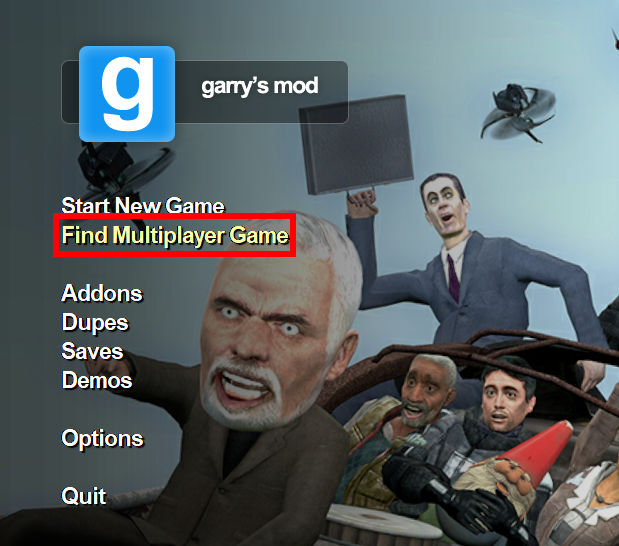
- Click "Find Multiplayer Game"
- Click local network where you should be able to browse and see your garry's mod server and join:
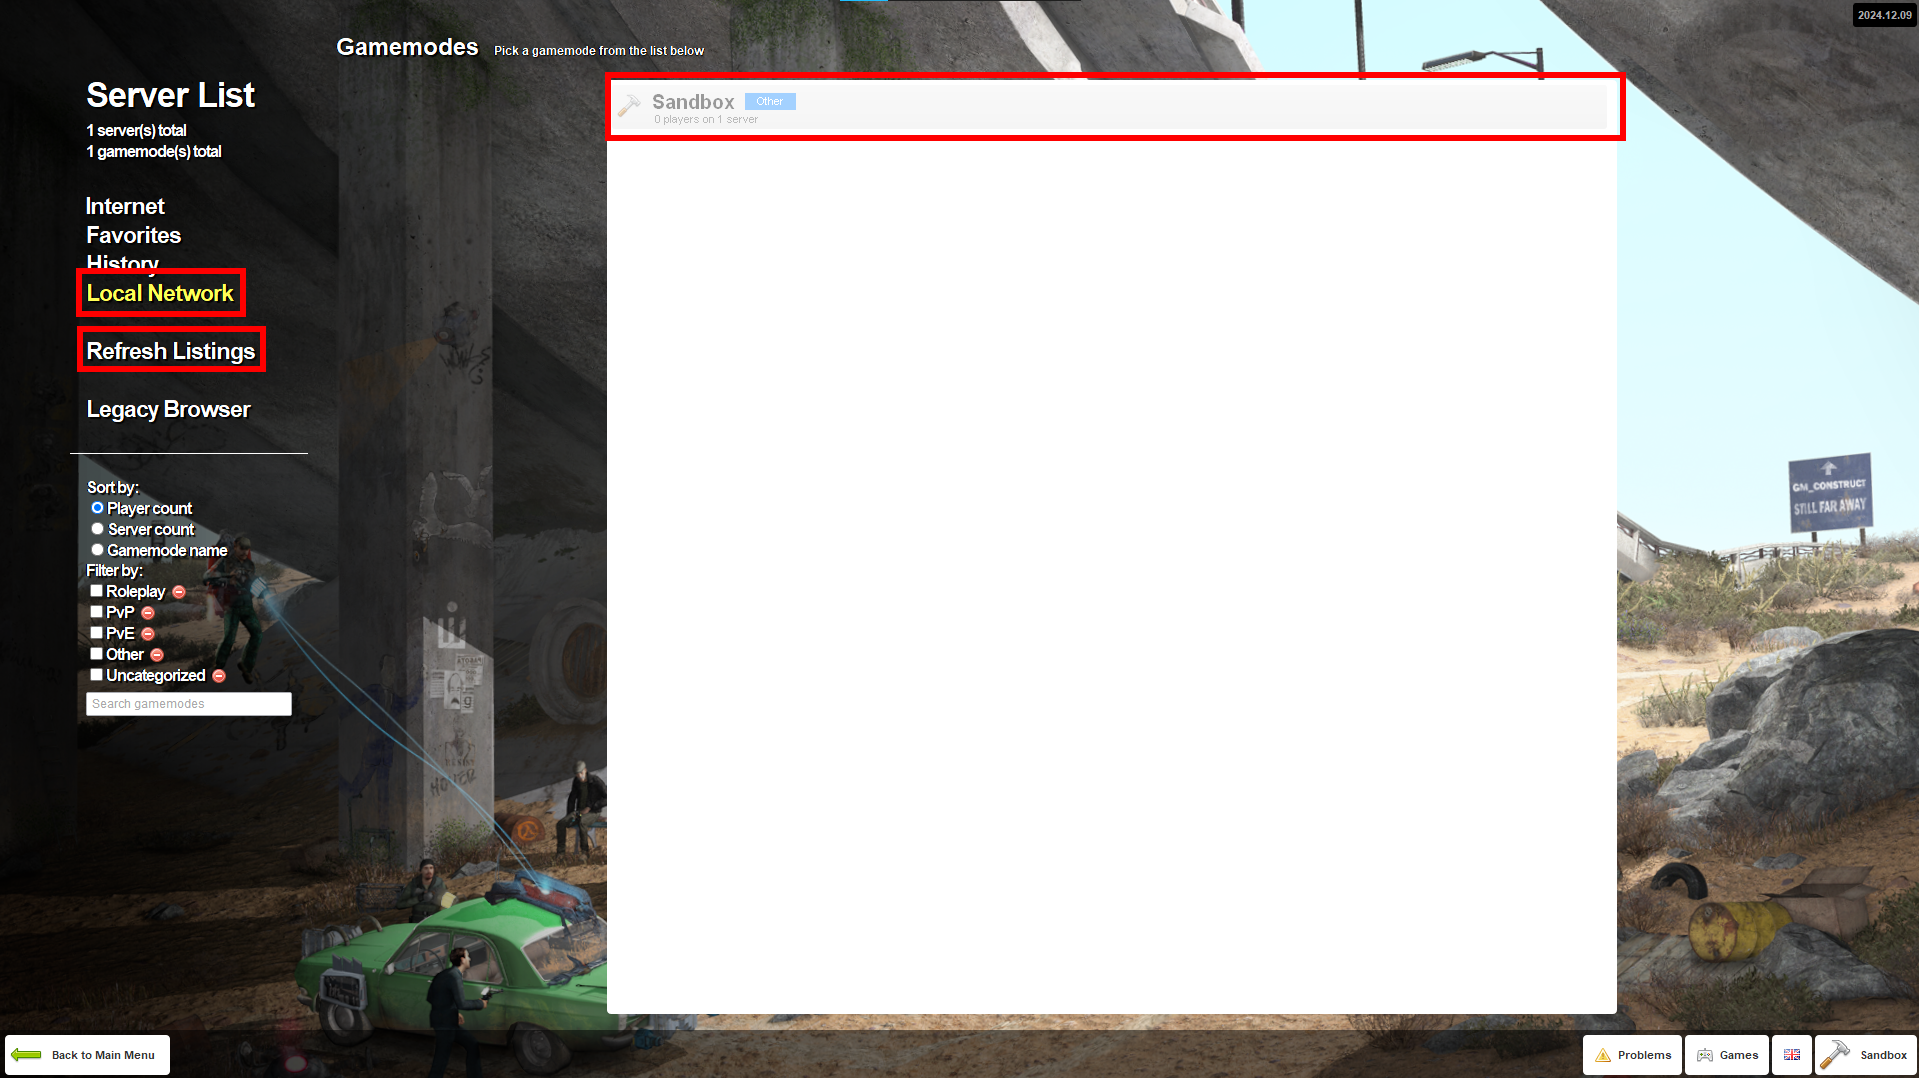
If it doesn't pop up, scroll down to join via an alternative method
- Click "Join Server" to join your gmod server
If your server is not listed because it's not a local server OR the port is different, then just go to your game servers in Steam:
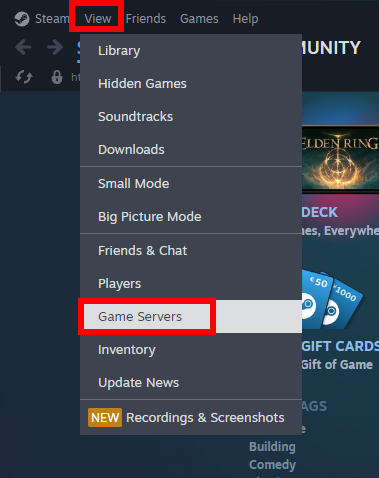
And add a new server:
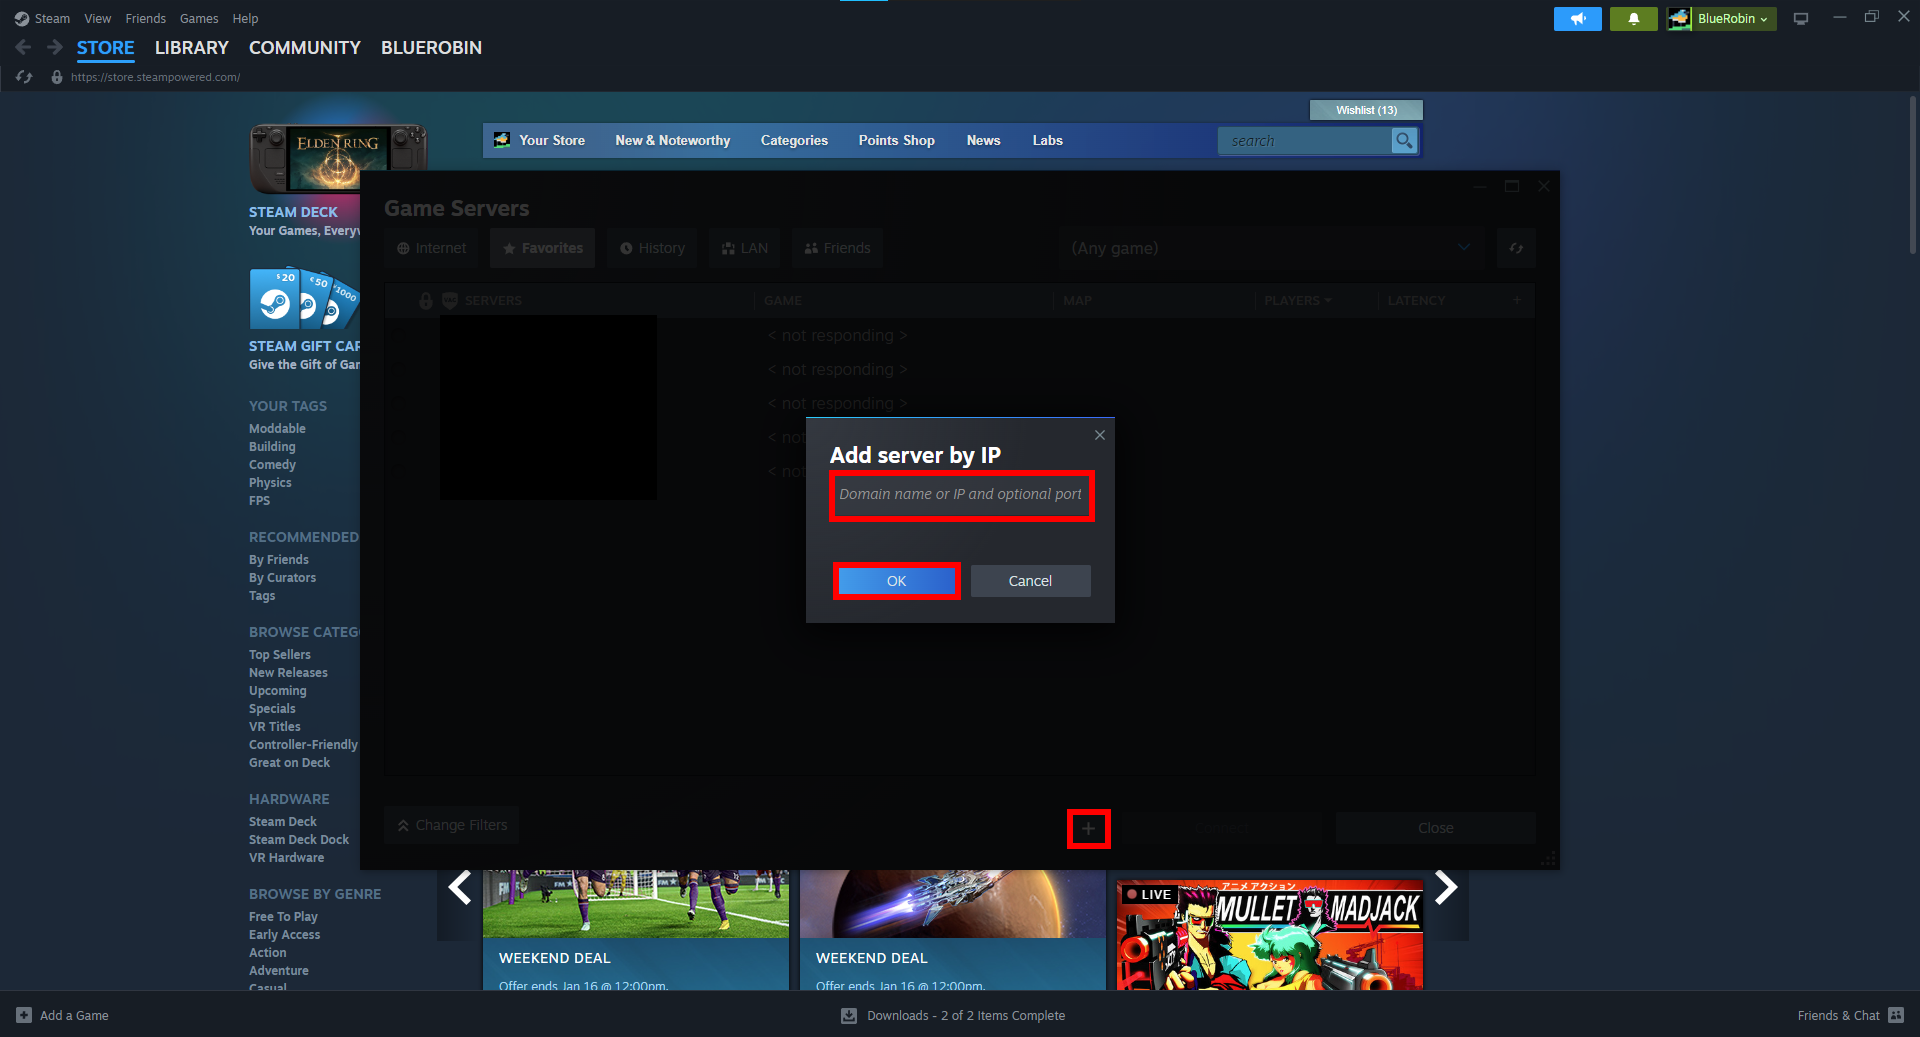
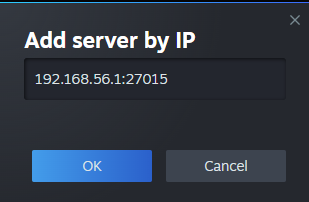
In this area, use the format: IP:PORT. Find the IP from the server's console (like before).
For example:
How to Port Forward a Garry's Mod Server
If friends are unable to join, then you might have to port forward. Port forwarding allows your server to be displayed across the internet and appear in the server browser.
- Go to your console and type
ipconfigand enter to get your default gateway:
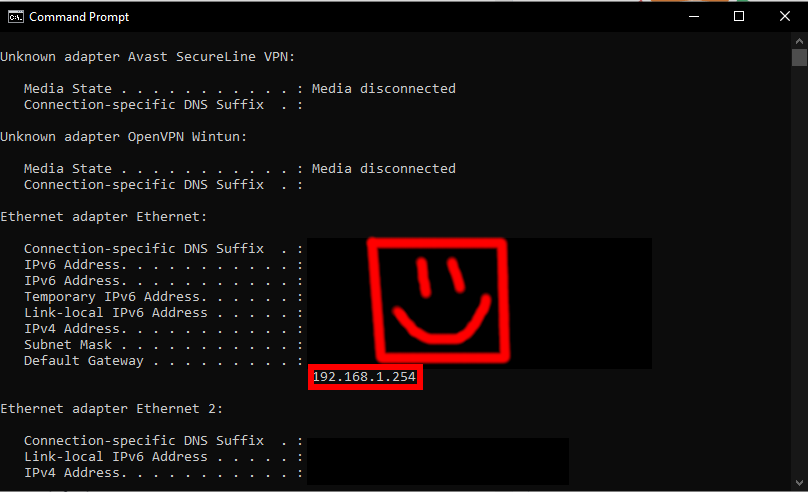
- After copying the above, paste it into your browser to edit your router's settings (an http or https page will be the response). If it is not your router's settings, then try checking for your default gateway's IP again.
- Login to your router and go to the port forwarding setting ( Note, many different routers have different settings for this and it's slightly different for each router)
- For most AT&T routers, it's under
Firewalland NAT/GAMING. From there, add a custom service (titled whatever) with the port range 27015 - 27015 and the protocol as TCP/UDP.
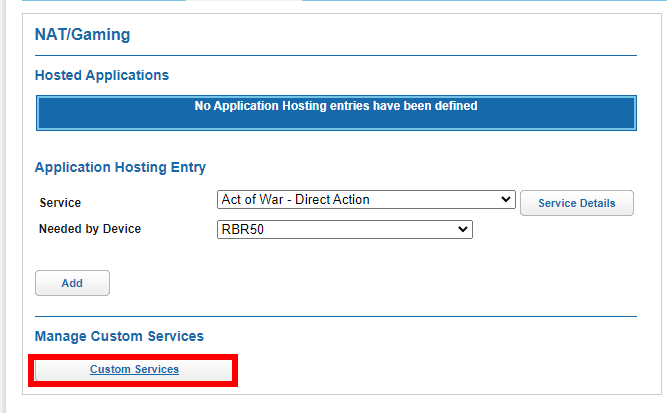
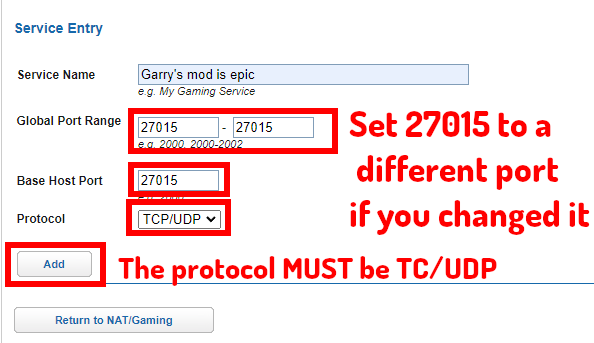
- Then go to
Application Hosting Entryand add your computer to the list of devices needed by the custom service:

- You might have to restart your router but if your garry's mod server exists, then it should appear in the browser.
By: Julian T.
Updated on: 03/02/2025
Thank you!